My in-laws came in for a surprise visit, but I have a few minutes to post a few cards I made before my unexpected but to the joys of my children guest came. Have a great rest of the week. And to those of you that may be on the East Coast, I am sending warm and supportive thoughts to you all!
Thank you for coming and have a quick piece of life’s pie with me.


Recipe:
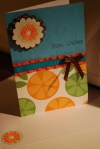
Cricut Cartridge – Potpourri Bonus sheet with the Ice Cream Cone setting at 3.75 inches for both shadow and image. I cut out the image twice for different paper for the cone and the scoop of ice cream.
Paper: Brazzil Pearl Shimmer, Brazzil Chocolate, Die Cuts with a View Summer Stacker, an old piece of scrap (pink and white checker paper have no idea who manufactured it.)
Ribbon Celebrations Michael’s Brand, Strawberry Cupcake Pink Baker’s Twin from My Craft Spot.
Button – Random button I had in my stash (acrylic clear flower)
Cuttlebug Folder – Flower Blossoms
Glossy Enamel – White
Sentiment – My Pink Stamper
Ink – Stampin’ Up- Early Espresso
Stickles: Bubble Gum


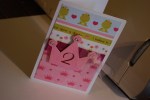
Recipe:
Cricut Cartridge – Rock Princess – Cupcake set at 3.75
Paper: Brazzil Pearl Shimmer, Brazzil Pinkini, Anna Griffin Peyton Collection (Zebra Print and striped paper)
Ribbon Celebrations Michael’s Brand for both Wild Animal Print and the hot pink glitter ribbon used behind the cupcake for dots.
Cuttlebug Folder -Happy Birthday
Sentiment – My Pink Stamper
Ink – Stampin’ Up- Early Espresso
Stickles: Bubble Gum – for cherry