RSS Feed

Tag Archives: scrapbooking

Mickey Mini Book

Mickey Mouse Mini Book
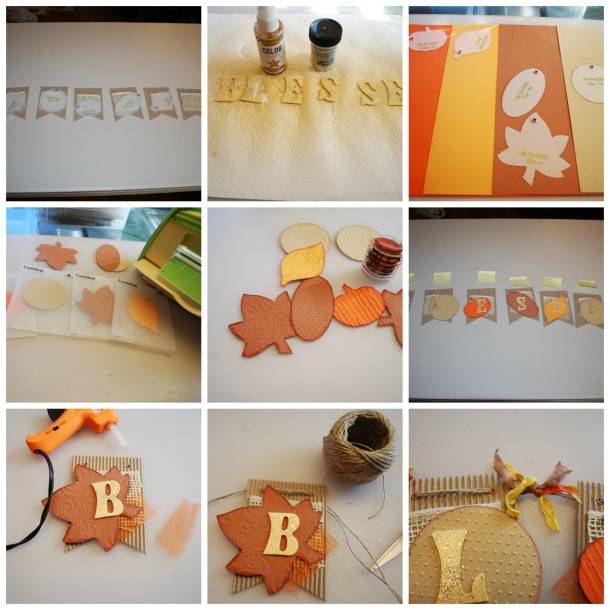
Well today we are hopping along with Out on a Limb Scrapbooking over at Xyron and my project was a BIG stretch for me.  I made my FIRST EVER mini book using Out on a Limb’s Mouse Memories- Mickey collection!  I have to say I did throw my whole Xyron inventory at the making of this baby, but it was fun.

OOAL banner

Me and my princesses recently headed off to Disneyland for 3 days with a dear friend and her princess.  I made this book with her in mind to give as gift to fill with her favorite memories from the trip.

Mickey Mouse Mini Book 3

It was super easy to make and my base was just a $ bin find from the craft store. I covered it with some pre-embossed paper I had on hand and went nuts!  Not to shabby for my first go at it, I must say!

Mickey Mouse Mini Book 2

Be sure to head over to Xyron and check out the fun hoppin’ goodies up for grabs and all the other fabulous Out on a Limb meets Xyron inspirations the DT has in store for you this week.

Mickey Mouse Mini Book 4

Supply List: 


Advertisement

Got Spring Fever?

1233458_10151842160503232_739318158_n

Head over to Kiwi Lane and check out how I made this VERY spring inspired project I have cooked up for today’s post! This was made with many of my fellow crafters in mind that are in need of a bit of a thaw out as I constuct this blog post in shorts and a t-shirt here on the west coast.

KLDjan1

Thanks for sharing a piece of “hoping Old Man Winter says adios to those on the East and hola to those of us on the West” pie with me.

Linking to:

Santa is Coming to Town!

1233458_10151842160503232_739318158_n

Oh what to do with all those “Santa visit” pictures that accumulate over the years?!  Why not scrapbook them! See how  me using Teresa Collins Santa’s List Collection and Kiwi Lane Designs templates made a quick and easy keepsake by clicking HERE!

KiwiNov4Linking Up To:

Paper Issues – It’s Beginning to Look Like Christmas


November Hoppin’ with Kiwi Lane Designs

1235934_10151851789028232_1167827849_n

Hi all! If you came over from Lissa, from Mighty Crafty, you are in the right place.  If you just joined me, be sure to check out this fun and amazing blog hop by starting HERE!  Be sure to leave comments to get yourself in the running for a $25 gift certificate over at the Kiwi Shop and the lucky winner will be announced on November 7th over at the Kiwi Blog.

Oh my do I have a treat for you and there are no tricks for of those of you that are recovering from Halloween night! Making banners is my first love of crafting and having Kiwi Lane Design templates in my back pocket made this whole project super easy to pull together. I have been wanting to have something special to snaz up my Thanksgiving motif and this little crafty number really speaks on the season.

DSC_7343

DSC_7345

DSC_7342

Here is how I did it!

Materials Needed:

  • Kiwi Lane Templates: Shapes 8T, 7T, Holiday 4T, Nature 4 and 1 
  • SEI Card Board Banner Kit
  • Heidi Swapp Gold Lame Color Shine
  • Cuttlebug Embossing Folders: Divine Swirls, Distressed Strips, Swiss Dots, Musical Florish
  • Wooden Lettering
  • Gold Glitter
  • Buttons
  • Hot Glue Gun
  • Hemptique Hemp Cord
  • Crinkle Ribbon
  • Tulle
  • Burlap

kiwilanecollage

All I did was design a layout using the actual templates and then I sprayed down some wooden letters with Color Shine and dusted with Glitter. I then traced and cut out templates, ran through the embosser and inked edges. I confirmed placement and then stated to build each pennant by layering burlap, tulle, cut, then letter. I added buttons to finish and then ran hemp cord through the pennants, linking them together.  I finished by cutting down three different colored crinkle ribbon and tied in between each pennant..

Giveaway Alert! 

There you have it! Easy peasy lemon squeezy! Now for a fun giveaway from me.  All you need to do is LIKE me on Facebook and tell me what you are thankful for in a quick post on my PAGE for and you will be in the running for Tiny Holiday Template set so you can get your own holiday craftin’ on!  I will announce the lucky winner on November 7th! 

tiny_holiday

Next up is the fabulous Kerri from Craft Time and Cupcakes! 

  1. Kiwi Lane http://kiwilane.com/here/blog/
  2. Cristine Redmond http://onescrappynovice.blogspot.com
  3. Joy Nielsen www.threadsnscraps.com
  4. Van Nguyen http://likethecar.blogspot.com
  5. Minousha Bari  http://preservedscraps.blogspot.com
  6. Lissa Mitchell http://mightycrafty.blogspot.com
  7. Arin Flynn http://apieceoflifespie.com You are Here
  8. Kerri Smith http://www.crafttimeandcupcakes.com/
  9. Christine Meyer http://scrappingwithchristine.blogspot.com
  10. Christina Steel www.tinasscrapcrap.blogspot.com

Hello Embossing Powder!

Happy Friday All!  Today my post is up over at Globecraft & Piccolo!  I would have to say this month’s challenge of using their AMAZING embossing powder as part of a layout base was brilliant.  As many of you know, this crafter hardly does any scrapbooking layouts . . . actually I usually run from the idea, but with this challenge I have found I really have enjoyed scrapbooking and most of all have figured out that you don’t need a million layers or embellishments to make a cute scrapbook page.

Head over and check out how I made this “sneak peek” a simple and easy layout with only using Globecraft & Piccolo Embossing Powders and some simple washi tape!

DSC_6892


Birthday Card for a Boy!

For some reason making cards with more of a girl theme comes easy, but when it comes to a boy I really had to get my thinking cap on.  Here is an idea that I created for an upcoming birthday boy!

The Card:

                                                                                                                                                                                                          (Click on Image to Enlarge)                               

Card: I found the pre-made plain white card in the $ bin at Michael’s.  They came in packs of six with envelopes.

Paper:  I used a piece of textured paper scrap for the solid color on the card and used additional scrap for the outfit, hair, club, and dinosaur.  For the striped piece of paper, I used Die Cuts with a View, Summer Stacker.  You can find that at Joanne’s. For the glitter #4, I used Die Cuts with a View Glitter Stacker.

Ribbon: I used some ribbon I got through the ABC catalogue about 4 years ago.

Cricut Cartridges: Paper Dolls (Cave Boy setting) and Sweet Treats (for the # 4). 

Stamps:  For the face of the cave boy’s face,  I used Peachy Keen stamps (Big Eyes).  For the “Birthday Fun”, I used  The Pink Stamper, Simply Sweet Occasions.

For ink, I used Stampin’ Up Classic Black.

* I used the My Pink Stamper Faux Chipboard concept (which I love) for the # 4!

* For the 3-D look, I used dimensional under the cave boy and the dino.

Card Making! My New Found Fav!

Well I started getting crackin’ at the whole figuring out my Cricut Expressions and I have to say I LOVE, LOVE, LOVE IT!  Here is one of my most recent projects I made. 

The  Card:

Paper: Michale’s

Tulle: Joann’s

Stamp: The Pink Stamper

Cricut Cardrige – Sweet Treats

( I made the crown doing a quasi chip board method that I learned on The Pink Stamper’s Video Blog)

Scrap Page:


Paper: Michaels

Tulle: Joann’s

Cricut Cartridge:  Story Book