RSS Feed

Tag Archives: Xyron

An Easy Teacher Gift Brewed Up

mclean bday1

Hello… I say sheepishly, as I know that it has been clearly over a year since I have posted a project. YIKES! Yes, I am slowly making my re-entrance back into sharing what I make. I humbly hope there are some of you that still  remember me as I sneeze through the dust from my poor neglected blog and share this fun idea I came up with for my daughter’s 2nd grade teacher.

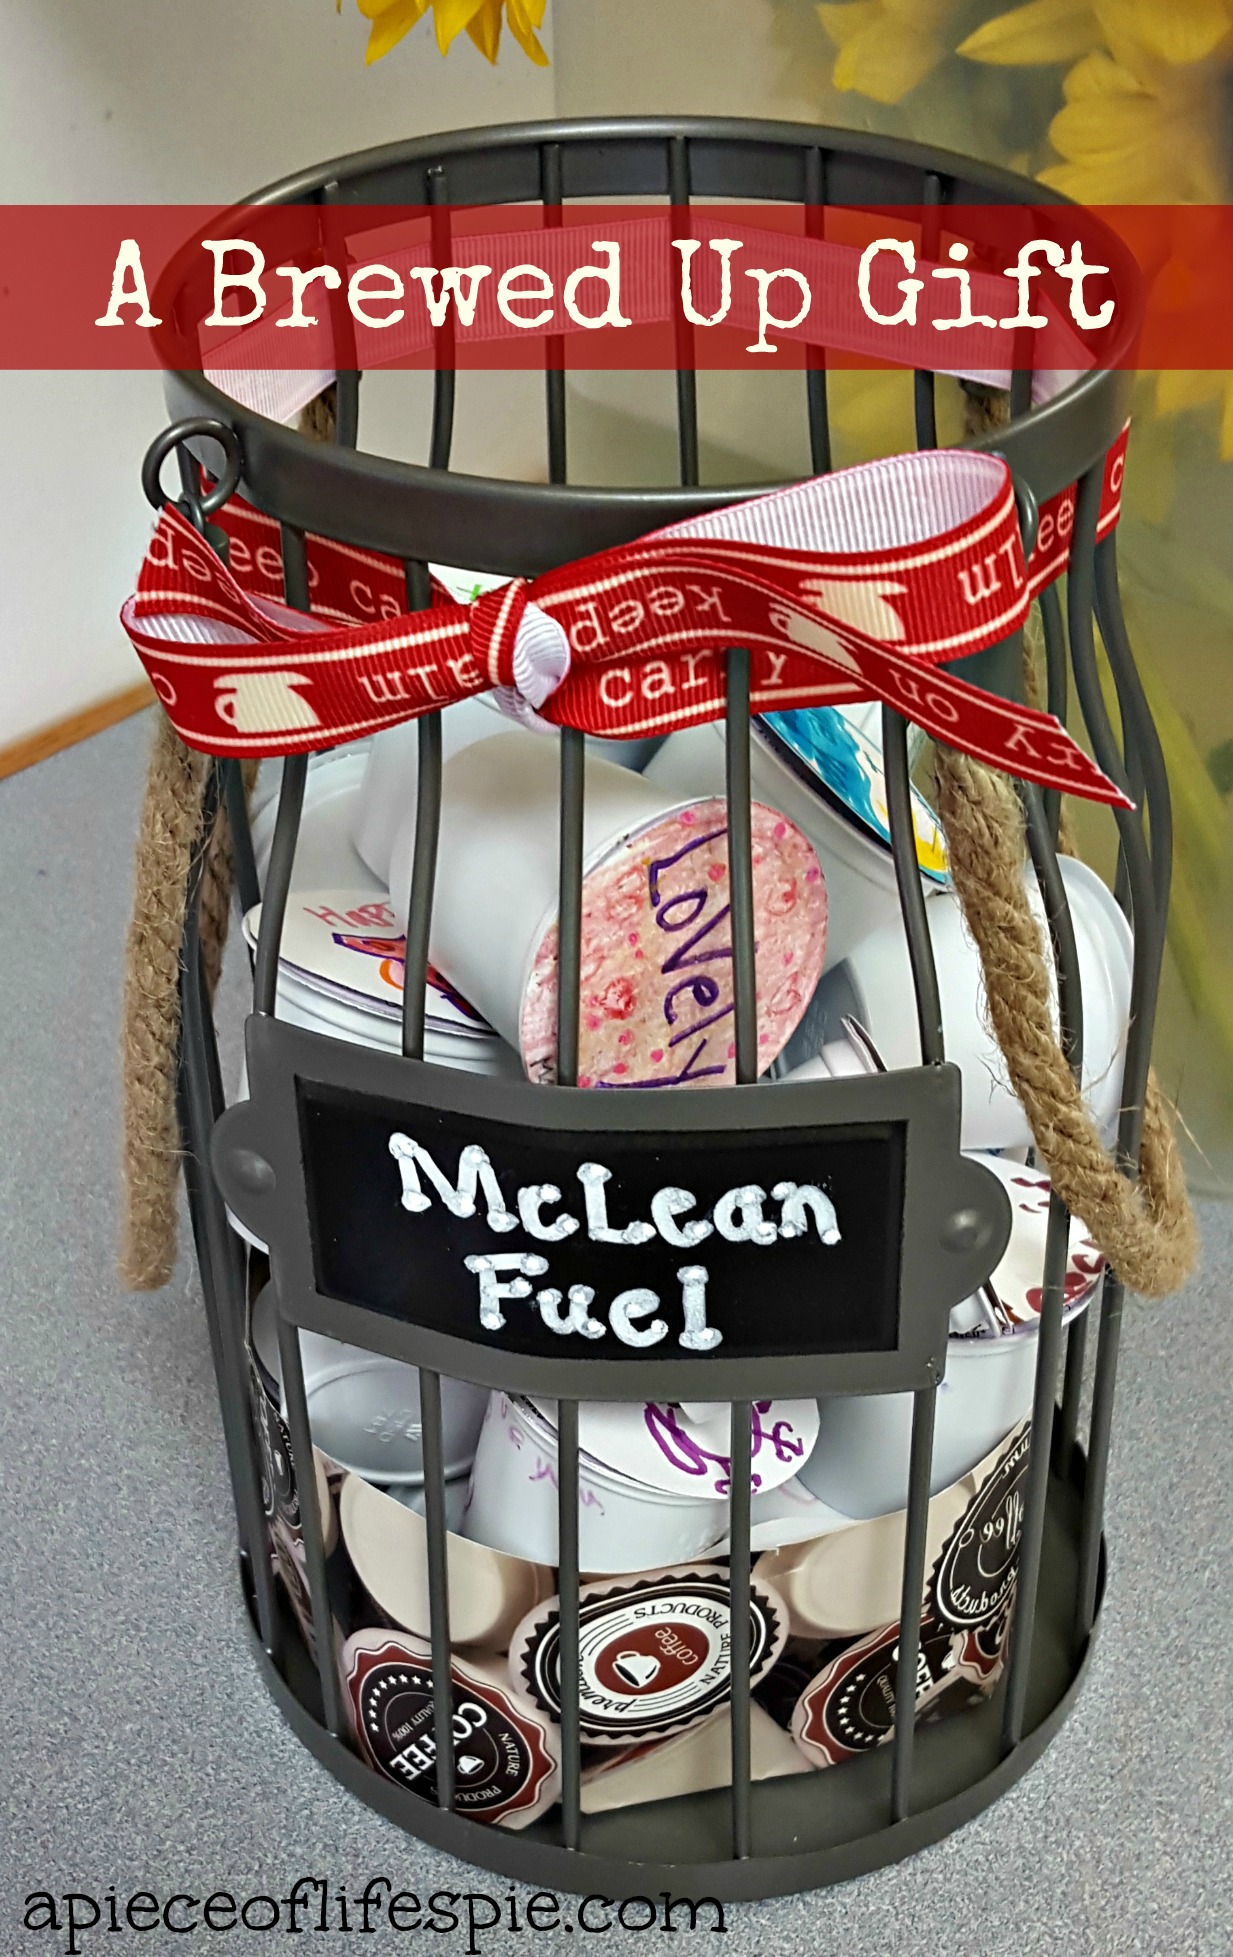
My kiddo’s teacher is truly powered by coffee. I am pretty sure it runs through her veins.  She even has a Keurig in her classroom for coffee on demand. So coming up with an idea for her birthday was pretty set with coffee.  I love making sure the kiddos are incorporated into the actual gift, so I figured out how to combine the both by adding some simple white card stock, Xyron Adhesive, a 2 inch circle punch and some kiddo creativity. I found a cute container for either coffee pods or wine corks at Kohl’s and poof, I got me an inexpensive, but sweet and useful gift for one great teacher!

20151014_080527[1]


Here is how I did it: 

20151018_172030[1]     20151018_171602[1]

I punched out 2 inch circles and had kiddos decorate and write one kind word that comes to mind regarding their teacher.

20151018_171738[1]

Then I added adhesive to the back and slapped that baby on top of a Keurig Coffee Pod and called it a day!  Yup, that easy! I have to say, she absolutely cherished this gift!  You could stamp, use pretty paper, add cute embellishments . . . the world is your oyster with this idea!

20151014_080527[1]

That is it! Easy peasy lemon squeezy!  Hopefully you found this one of those ,”Eureka!” type of crafty projects, like I did. AND mostly thanks for stopping by and visiting an old crafty friend.

Advertisement

DIY States Where I Lived Home Decor

Hello and Howdy!

Today I am lucky enough to be up on the Xyron Blog showcasing this project that has been on my bucket list for a LONG time.  Xyron has partnered up with the fabulously creative company, Maya Road, and I lucked out with two different types of embellishments that just screamed must be used!  I gathered up an old pallet piece I have been patiently allowing to cure, pulled out the paints once again, fired up my Silhouette and secured my two fav Xyron companions of Xyron Dots and the 5 inch Creative Station and got busy telling my geographical story.

DSC_8037

So what I did here is just break down the acutal cut file to just the state by ungrouping and making a compound path and deleting all but the state. Then I cut each state at 4.5 inches (Cut files click HERE and HERE), ran it through my 5 inch Creative Station. I used the Brooklyn Stack from DCWV for the paper choice.  I took the Maya Road Lisa Upper Case Letters and heat embossed them with a Rust Embossing Powder from Globecraft and Piccolo then ran through my 5 inch Creative Station and placed on the pallet.

DSC_8040

Then for the crown jewel of the project, I scored these adorable wooden embellishments, Alterable Bingo Motifs from Maya Road, and added a little paint and Xyron Dots and placed them in the area of the cities my hubby and I have lived in.  For instance my hubby lived in the Bay Area while he attended college so he got a bird signifying flying away from the nest.  We currently live in Southern California so we have the house as a symbol.

DSC_8041

I went to college in Dallas, Texas and the star star symbol is kind of a BIG deal in Texas so I added that.

DSC_8042

For Colorado, I was born and lived in the Colorado Springs area and it still to this day owns my heart, hence the heart.  Colorado is beautiful and when I am there visiting, it feels like it is home.

Be sure to head on over to the Xyron Blog and see what my other fellow Design Team gals have cooked up . . . they never disappoint!

Interchangeable Pix Collage

10487189_10203000932839116_1539748684738675039_n

Happy Tuesday and boy is summer flying by here!  Speaking of summer I made a very fun gift for a friend that has three beautiful boys and they are all rays of sunshine in my book.  When I got my happy mail from Xyron last month filled with May Arts Ribbon and Simple Stories Good Day Sunshine Collection I just fell in LOVE . . . in love enough to schlep out the paint, stencils and a mini pallet to cook up this colorful and full of life interchangeable picture collage that was made for this cheerful brood of boys!

DSC_8023

As you can see I went to town with the craft paint using some stencils I had from Hazel and Ruby. Since this was geared for mugs of boys, I decided to be playful with the paint and allow for some rustic bleeding around the edges. All I did was add a very small amount water to the painted area with a paint brush and then smear it with my finger… got a few splinters, but it’s all good!

DSC_8024

I cut down and added some card stock design paper from Simple Stories Good Day Sunshine Collection and ran it through my Xyron 5 inch Creative Station and applied it to the painted pallet.  I then added the May Arts Ric-Rac Ribbon by hot gluing to the back of the pallet. This is base for anchoring pictures with the help of mini clothespins.

DSC_8022

I added some sticker sentiments from the collection and then using Xyron Dots, I added some colorful sequences! Have I ever mentioned that my love for Xryon Dots run deep? This would be one of the things I would drag out with me in case of a fire!

DSC_8025

As you can see this project is another super easy DIY number that could be a great gift or personal keepsake.  Be sure to head over to the Xyron Blog and check out what my other fabulous partners in crafty crime have cooked up today!


DIY Postcards

524049_10150857700548745_275836723_n

Happy Almost 4th!  Today is my lucky day to showcase a fun project I made using Lawn Fawn Stamp Set – So Much to Say and my trusty and I do mean trusty Xryon Mega Runner, that is up on the Xyron blog today. (Side note: I have used several Advanced Tape Guns and the Xyron Mega Runner is by far the BEST I have ever used- No fuss in the refill process and strong adhesive – I think I am in love!)

DIY Postcard

It is summer and if any of your are like me, you are in a fun whirl-wind of road trip travels, camping and kiddo camps. Since I have a 1st grader and a Kindergartner, I wanted to drag along some postcards they could practice their writing share their adventures with family and friends.  I needed these to be bigger than the normal postcard due their giant chicken scratch  eagerness of being early writers, so these will take a normal postage stamp. These are a cinch to make and you can even have your kiddos help or make on their own.

Here is how I did it (full supply list at the end):

For the Front of the Postcard: I found blank white card stock quality cards at the local craft store with the measurements of 6.5 inches wide and 4.5 inches tall. Using a paper trimmer, cut down some desired design paper with the measurements of 6.25 inches wide and 4.25 inches tall.  I stamped the sentiment and image on the design paper.  Using Xyron Mega Runner, adhere the design paper to the plain white card stock.

DIY Postcard3

For the Back of the Postcard: Measure the card and find the middle. Using a ruler, draw a line using a Jelly Roll pen and added some dashes for interest.  I printed “To” on the right side and stamped a coordinating image from the front.

DIY Postcard1

I set up an “assembly line” and mass produced these in no time. You can go as simple or as detailed you want – keep in mind these are postcards and they need to be flush.

DIY Postcard2

Supply List: 

  • Lawn Fawn – So Much To Say stamp set
  • Xryon Mega Runner
  • Paper Trimmer
  • Recollections Chevron Paper
  • Recollections Blank White Cardstock Cards (6.5×4.5 inches)
  • Ruler
  • Black Jelly Roll Pen
  • Stamp Block
  • Stampin’ Up Ink (Classic Black and Pumpkin)
  • Close to My Heart Ink (Slate – used for the yellow card)

Happy 4th and Happy Summer!

Arin


Traveling On. . .

10376142_10202656880718028_1237342031760719760_n

Bonjour! All week Xyron and Paper House have been traveling the world together!  If this is your first stop, please head over to Xyron’s and Paper House blogs and see what they got cookin’ in the areas of inspirations and awesome giveaways.

Since I am so lucky to be on both design teams I had a change to take a stab at two projects!  My first project is a travel journal I made for my daughter.  This summer we are going to travel the world . . . OK we are going to the Vegas strip to give a “Cliffnotes version” of what Paris, Rome, Italy, New York, Seattle and Egypt is like to my 5 and 6 year old.  In that spirit, I whipped up a cute travel journal for my 6 year old to record her adventures in each place.

Here is how I took an ordinary $ bin composition book and turned it to this (fully supply list included at the end of this post):

DIY Travel Journal 1


Xyron 1

Xyron 2

xyron 4

Add embellishments to cover and use faux stitching on the pennant banner.  Use letter stickers for the name and Baker’s Twine for the accents. To secure the bow along the spine, use a Xyron Dot.

xyron 5

Supply List:

Now since I am playing double time designer, I made a fun layout (yes, I said I made a layout) of my time so long ago in Yellow Stone using Xyron 5 inch Creative Station and Paper House Yellowstone Collection to represent Paper House. Whew wearing so many hats can get a tad bit sticky (pun intended)! 🙂  How fun is this collection, it brought me back to some fun memories and I almost felt I was there while working with the collection. So if you have Yellowstone on your adventure list this summer, this collection is a must!

DSC_7926


Mickey Mini Book

Mickey Mouse Mini BookWell today we are hopping along with Out on a Limb Scrapbooking over at Xyron and my project was a BIG stretch for me.  I made my FIRST EVER mini book using Out on a Limb’s Mouse Memories- Mickey collection!  I have to say I did throw my whole Xyron inventory at the making of this baby, but it was fun.

OOAL banner

Me and my princesses recently headed off to Disneyland for 3 days with a dear friend and her princess.  I made this book with her in mind to give as gift to fill with her favorite memories from the trip.

Mickey Mouse Mini Book 3

It was super easy to make and my base was just a $ bin find from the craft store. I covered it with some pre-embossed paper I had on hand and went nuts!  Not to shabby for my first go at it, I must say!

Mickey Mouse Mini Book 2

Be sure to head over to Xyron and check out the fun hoppin’ goodies up for grabs and all the other fabulous Out on a Limb meets Xyron inspirations the DT has in store for you this week.

Mickey Mouse Mini Book 4

Supply List: 


Craftin’ Up Something Gifty!

76834_10152085028263232_1279811947_n (1) TGIF!  Well here we are a hoppin’ with Kiwi Lane Designs and I have have to say I had fun making this project with Fancy Pants Be Different Collection and KLD Tiny Brackets.  I found this cute 3D gift card box over at online Silhouette Store and went to town. This project was made for Admin Assistant Appreciation Day (a schmooze gift my hubby could give to some of the admin support around his office). However, with Teacher Appreciation Week this upcoming week this is an idea that you may want to put to use ASAP.

gift card box

DSC_7803

  • I cut the base out on American Crafts card stock folded and glued the joints together and inked the edges. I then and cut, traced and inked the bracket templates from the Fancy Pants Collection and adhered it to the base with my Xyron Mega Runner.
  • I added some sticker embellishments from the collection and a button with some baker’s twine.

DSC_7804

  • For the insert, I lined it with some corrugated paper from Die Cuts with a View.

DSC_7800

That was easy huh?! Now keep on hoppin’ and enjoy all the other amazing inspirations being cooked up for you.

Giveaway Alert! 

Let me know, by leaving a comment, what you like to do with Kiwi Lane Templates and you may be a lucky ducky and score KLD Floral Template set – Just in time for crafting up some spring projects. I will announce the winner on Monday!

floral-600x600


Hop Line Up:

  1. Kiwi Lane http://kiwilane.com/here/blog/
  2. Lissa Mitchell – http://mightycrafty.blogspot.com/
  3. Leslie Prinkki – http://www.scrapsofmine.blogspot.com
  4. Connie Wallenbrock – http://conniecancrop.blogspot.com
  5. Sandi Pressley – http://lifeatthebeach51.blogspot.com/
  6. Christine Meyer – http://scrappingwithchristine.blogspot.com
  7. Alicia O’Bryant –http://goldengoddessdesigns.blogspot.com/
  8. Suzanne – http://scrapwithsuzy.blogspot.com
  9. Roselyn Riley – http://prettylittlepackages.blogspot.com/
  10. Arin Flinn – http://apieceoflifespie.com  YOU ARE HERE


Thank You, Thank You Very Much Card

PHP_ArinBanner


Hi there!  Today I have a fun Elvis card up over at Paper House!  One day I will get to Graceland, but until then I am sure glad Paper House has a fun Elvis Collection.  Pop over and check out how I made this little number!

Elvis Thank You Card 1

Linking Up to:

Paper Issues Pitch Perfect

Layout Art . . .

1233458_10151842160503232_739318158_n


Happy Earth Day folks!  Today up over at Kiwi Lane Designs is a fun layout I made with Zero pictures.  We were lucky enough to have access to My Mind’s Eye Now and Then Collection and using some new templates I just went nuts making a camping themed page by adding some fun elements with Heidi Swapp’s Color Shine and Xyron Mega Runner and Xyron Dots. Head over and check out more of this page and the C-U-T-E templates that made all this possible!

camping layout using MME

KLDApril2

Until next time,

Arin

Linking up to:

Paper Issues Pitch Perfect

It is All About the Kiddos Hop!

Kids Blog Hop

Woot!  Today is the day for the Paper House Productions “Hop, Skip & Jump” Kids Blog Hop this weekend! The Design Team has some fun kiddo inspired creations cooked up that you will not want to miss! There are amazing goodies up for grabs that are just must haves for any crafty stash.

How to ENTER: 

  • by liking us on Facebook
  • AND commenting on each of our designers’ posts! If you do, you’ll get +10 entries into our drawing!

Easy peasy lemon squeezy just like this fun project I made with the Owls Hoot Collection!  All I did was reclaim a tabletop house shaped bookcase I found on clearance for $5 at Target and turn it into a dog house for my kiddo’s American Girl pets!  My kiddos love owls so this collection came in handy  since I made all their American Girl Doll bedding with owl fabric. Love when crafty kismet happens!

American Girl Doll Pet House

What I did was measure and cut down the design paper and attache using my Xyron Mega Runner and for the ribbon, I cut down American Crafts ribbon ran it though my 5 inch Creative Station and dressed the internal and external edges.  I traced out some flower stencils using Kiwi Lane Designs Tiny Accents, inked the edges and ran through my Xyron Creative Station and attached to the roof. I dressed the house with flower accents I had on hand and the collection 3D stickers and Puffy stickers.

American Girl Doll Pet House2

Now how is that for turning $5 and some cute crafty supplies into something that will be cherished and played with for many play-times to come?

Now make sure to hop through each designer down the list to be eligible for the most entries! When you’re done, just hop over to Paper House Blog and let us know! The hop will be running all weekend, so you have until Sunday at 11:59pm EST to get your entries in!

Kids’ Blog Hop Designers

Larissa Heskett

Irit Shalom

Kim Kendell

Christine Meyer

Arin Flynn You are here

Susie Bentz

Bev Code

Giorgia Rossini

Erin Reed

Linda Auclair