RSS Feed

Tag Archives: DIY

A Valentine Sweet!

Happy Monday All!  I can’t believe it is almost Valentine’s Day!  Today over at Fantabulous Cricut Challenge Blog we are kicking off this week’s challenge with making Valentines!  You will want to get in on this so be sure to pop on over and check out all the sweet inspiration from the design team and link up a Valentine using at least one Cricut cut!

Here is what I cooked up for this week’s inspiration

fccb

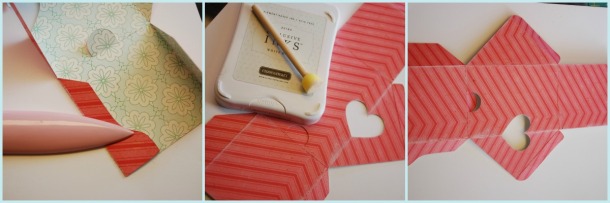
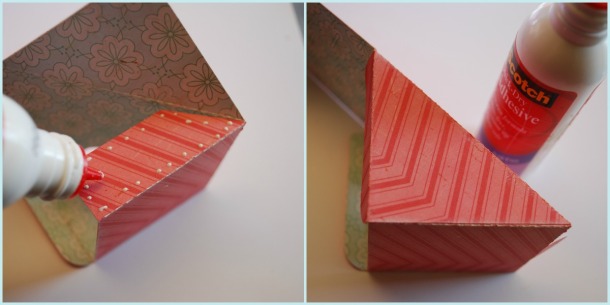
This card was super quick and easy to make!  The card was a cut from Samantha Walker Designs found over at the Silhouette store!  I resized this card to be around 5 inches tall and 3.5 inches wide.  I found this card fits nicely in one of the extra envelopes that I had left over from my Costco Christmas cards.  I decided to raid my scrap stash to make this card and thankfully I had enough of everything! I embossed the black card stock with the Christmas Trio Cuttlebug folder set.  I inked the boarder with Stampin Up Classic black.

DSC_5575

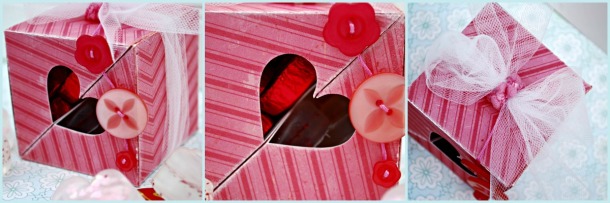
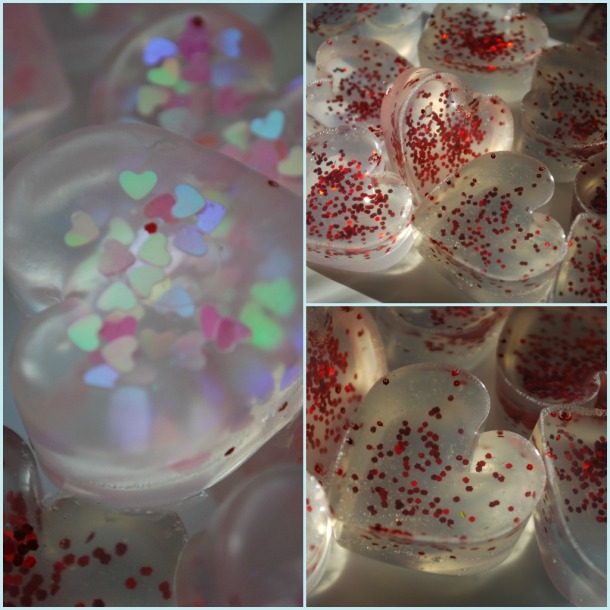
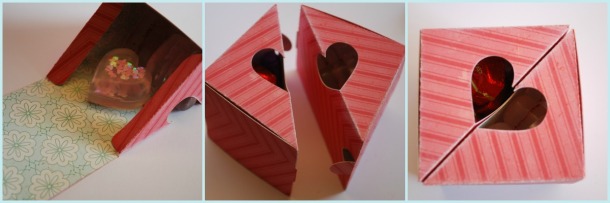
For the candy dispenser I cut just one layer at 3 inches and modified it to fit an adhesive treat heart I found through Stampin’ Up.  I embossed the the dispenser with Cuttlebug Swiss Dots.  Using CANDi embellishments, I glued two of the CANDi pieces together to make them 3-D and added them into the heart and constructed the candy dispenser onto the black card stock.  I love how this really looks like candy in a candy dispenser!

DSC_5577

I added baker’s twine from the Twinery, stamped the sentiment from My Pink Stamper’s Happiest Moments stamp set and added more cute little CANDi to the heart!

DSC_5583

On the inside of the card I added some white card stock that was inked with Close to My Heart Holiday Red.  I added washi tape from Queen and Co’s Valentine line and yes, MORE CANDi!

Now be sure you head over to FCCB and join in on the fun this week!

Thanks for sharing a piece of “who needs Hallmark when you can make it yourself” pie with me!

Linking Up To: 

My Craft Spot

Sarah Hamer Designs – Link Up Tuesdays

Everyday is an Occasion

I Gotta Create – Wildly Original Linking Party

V’s Sweet Ideas – Love Theme

Scrappy Moms Stamps- Valentine

Bitten By the Bug 2 – 

A Lovely Blog Hop Filled with Good Clean Fun & Blog Candy!!!

download
Happy Saturday!  Welcome to the A Lovely Blog Hop, hosted by the sweet and ever lovely Jill from Every Day is an Occasion!  I am so thrilled to be hopping along with these fabulously talented ladies and I hope you will hop along to see some of the A-M-A-Z-I-N-G Valentine inspired projects!  If you just joined us, please click HERE to start from the beginning   If you came from Kelsie Ann from Cut Craft Create, you are in the right place!
What I have cookn’ for you today is a two part project! The first part is a super easy and clean way to express your Valentine cheer . . .  Homemade soap!  If I knew it was this easy, I would have been doing this for years! I actually had the kiddos help in making a few batches. The second is a super sweet and simple two piece box cut from Samantha Walker’s stash of amazing Silhouette designs.
SWVbox1
swpix1
Now before you check out the tutorials below and hop on over to Court from Court’s Craft Corner, up for grabs is some fun blog candy!

To win you need to:

  1. Leave a comment
  2. Are subscribed to this blog
  3. and LIKE my Facebook Page
I will be announcing the randomly picked winner via my blog and Facebook page 2/14/2013!  Who does not love WASHI TAPE?  These four amazing designs are from Paper Issue’s Esty store and could be yours! 
blog candy
Hot Pink Quatrefoil Washi Tape
Yellow Chevron Washi Tape
Grey and White Polka Dot Washi Tape
Are Those Aqua Birds on That Wire Washi Tape


Now on to the tutorials!

For the soap:  I found the 2 lb scored clear glycerin soap brick on Ebay. It is made in the USA.  It was around $7, but shipping was about the same.  YIKES!  However, a little goes a long way, so you get your money’s worth.  I found a how-to example on Pinterest, but  I decided to document how I did this, since I was using different tools.

swpix3
First I cut up the glycerin soap only using two scored rows and chopped coarsely (the original tutorial said it breaks apart easily with your hands, that was so not the case with my brick. That stuff was hard as a rock!).  I found that two rows makes one batch using my mold.  I then added the chopped pieces to a glass measuring cup and microwaved it to melt it down in 3-4 ten second intervals stirring it each time (you really need to babysit this part, but what is 40 seconds of babysitting?).
swpix4
I then pulled out my silicone heart mold I found at IKEA for $1 and poured the melted soap into the mold at a little under a half.  I then added Recollections Berry Red Course Glitter for one batch and then some $ Bin find heart shaped glitter for the second batch.  You need to move quickly, because it sets up fast.  Once glitter was added, I then allowed for it to harden just for about a minute and then topped off each heart with the melted glycerin.
swpix5
It takes about 15 minutes to completely set.  All you do  is pop them out of the mold and they are done!  Easy peasy!
swpix7
For the box:  You can find the Pair of Hearts cut over at Silhoutte, click HERE!   It imports to your screen with both boxes fitting on one 12×12 piece of card stock (I used the stock size that it was imported in and was super happy with the size- it was nice not to have to mess with re-sizing for a quick project).  When doing a test cut I found that I needed to make sure to use a thicker design paper due to needing more structure; I used Crate Paper, Little Bo Peep.  I placed the side of the paper I wanted to see on the outside of the box facing up.  I did do “multi-cut”.  Once cut, I folded the box, using a bone folder. I then inked the edges with Close To My Heart White Daisy stamp ink.
box1
 I then formed the box and glued the two flaps to secure it.
box2
Once glue dried, I  filled the boxes and closed them up (one box held 5 pieces of Bliss chocolates and one box held 4 heart soaps.)  I then attached the boxes together.
box3
Once boxes were assembled, filled and attached, I cut a piece of white tulle that was about 2.5 inches x 12 inches. I then wrapped that around the box and tied a bow at the top.  I then made a button chain using Close to My Heart Red Assortment buttons and Close to My Heart Bubblegum Embroidery Floss using the below technique.
box4
I then tied the button chain to the center of the bow and then wrapped Close To My Heart Cotton Candy Designer Ribbon around the middle of the bow to hide the embroidery floss.
swval2
I then attached the button on the button chain to the box for more security with Glue Dot minis.
swval3
There you have it! A sweet and chic Valentine treat!
swpix1
Thanks for sharing a piece of “wishing you a very sweet and squeaky clean Valentine’s Day” pie with me and be sure to head over to see what sweet, and I do honestly do mean sweet (I have had the honor to meet her) Courtney, from Courts Crafts Corner has to share! 

If you lost track of the hop, you can refer to the below 🙂

Linking up to:

Quick, Cheap, Simple and NO SEW Pennants!

Happy Friday All!

As promised I am sharing the “how-to” on the pennants and stands for a sweet Valentine’s Day decor.  This is something you could knock out in a few hours and that includes the trip get the goods!  This project cost around $10 to make.  A perfect project for this weekend! You could also whip one out for St. Patrick’s Day or even Easter!

tut 3

Step 1: First I found the “stands” at Home Depot.  They are table legs. The do have screws at the bottom, so use a pair of pliers and twist it out (remember righty tighty, lefty loosey 🙂 )  I first applied two coats of Gesso Primer paint (you can use just plain white craft paint instead if you don’t have it on hand)  I then LIGHTLY sanded down the rough and uneven painted areas.  I then started to build my paint layers using pink and red, making sure each color was dry before applying the next (make sure each just apply the colored layers in a random and spotty way, you are going for a rustic feel).  For the top coat of white, I applied two coats to completely cover the table stand.  Once dried, I then hand sanded each table stand to expose the color coats in random rustic pattern.

tut1

Step 2: I had the fabric store cut four different fabric patterns at 1/4 of a yard.  I then ironed each piece of fabric.  Be sure to fold in half with the back exposed and iron flat.  I then cut a 5 inch pennant from Cricut Cartridge Celebrations, using the “foundation pennant” on plain white card stock.  You can just as easily make your own stencil free hand as well.   I then placed the stencil at the top of the fold and traced it using a colored pencil.  Once all four fabric pieces are traced, cut and lay out flat. To fasten the two pieces of the pennant together, you can either use hot glue or heavy duty double sided tape.  I used double sided tape (be sure to really press down the tape before pulling off the top strip).  BE SURE TO LEAVE A LARGE ENOUGH GAP AT THE TOP OF PENNANT SO YOU CAN RUN A PIECE OF YARN THROUGH. Flip top over and adhear to the bottom.  String through and attach to each painted table leg

tut 2

Step 3: In making the hand crochet bows, make a 12 inch chain using three different colors of yarn cut at 24 inches each and tied together at the bottom.  Once chain is made, tie in a bow and attach a Glue Dot to the back of each bow and attach to the table leg (the reason I used a Glue Dot instead of hot glue is that the bows are removable and I can use the table legs for another themed pennant project (birthday party, Easter, etc.).  To see how to make the hand crochet chain, check out the included YouTube video I found!

tut 4

tut 3

Thanks for sharing a piece of “crafting cutness on a dime” pie with me!

Hello Kitty Mania has Just Begun!

My four-year old is a HUGE Hello Kitty fan.  Back in January I went on the hunt to buy the Hello Kitty Cricut cartridge only to find out that it was retired and trying to purchase one via Ebay or Amazon would cost the fortune of a small country.  I found someone who sold the die cuts and ordered them and then added extra touches to them. 

Here is the first installment to the Hello Kitty mania I am underway on . . . birthday invitations.

Thanks for coming and sharing a piece of “when it comes to Hello Kitty, if there is a will there is a way” pie with me.

This slideshow requires JavaScript.

recipe:

Hello Kitty Greetings Cricut Cart – Cut at 2 inches

Mini Monograms Circle cut at 3 inches “Real Dial size”

Paper: Recollections brights

Card Base:  iCraft scallop card sets of 8 at Michael’s $ bin

Cuttlebug: Happy birthday folder

Ink: Jelly Roll Pens for stitching

STICKELS!  Diamonds!

MPS Christmas Card Challenge

My Pink Stamper just announced a Christmas Card Challenge.  I was so excited about this since I wanted to execute an idea I have been brewing up.  Most of all I am thrilled I get to kill two birds with one stone!  That is sooo my kind of project!

Both my girls are in gymnastics and we just adore their coaches.  It takes a special person to want to take on the challenge to teach a 2 and 3-year-old how to jump, tumble and balance… I call it “herding cats”.  Because of that I wanted to do something a little more than just give them a card or a “homemade treat”.   I decided that I will give them both Starbucks gift cards during the holiday.   They are both young college students that are being fueled by the sweet nectar of energy, so I figured they would appreciate a holiday theme gift card-card screaming a blissful cup of joe! 

So not only did I come up with a fun card, I made two of them and now I am done with that “holiday to-do” WAY ahead of schedule!  Yay!

Thanks for coming and having a piece of  “killing two birds with one stone” pie with me!

Recipe

Cricut Cartridge:  Love You a Latte (Cricut Lite) – To-go coffee cup cut at 5.5 inches (real size for 1st layer and then 5.5 regular size for the additional layers)

Cuttlebug: 

  • Snowflake
  • Swirls

Paper

  • Papertreyink – Christmas Prints
  • Die Cuts with a View – Shimmer Matstack (green and red) 
  • Recollection – Mat White Cardstock (full 8×11.5 cut in half and then folded in half to make the card)

Ranger Prefect Peals:  Biscotti – I used this on the snowflake embossed sheet and then used a wet wipe and lightly wiped it down to make it have an extra shimmer yet distressed look)

Ribbon: Baker’s Twine – My Craft Spot

Stickles: Frosted Lace – used on the Swirl embossing on the cup.

Punch: Martha Stewart’s – Traditional Scallops

Ink:  Close to My Heart – Holiday Red

Sentiment: “Warmest Winter Wishes” –  My Pink Stamper’s Winter Punnies

Just Some Fun Cards!

My in-laws came in for a surprise visit, but I have a few minutes to post a few cards I made before my unexpected but to the joys of my children guest came.  Have a great rest of the week.  And to those of you that may be on the East Coast, I am sending warm and supportive thoughts to you all!

Thank you for coming and have a quick piece of life’s pie with me. 

Recipe:

Cricut Cartridge – Potpourri Bonus sheet with the Ice Cream Cone setting at 3.75 inches for both shadow and image.  I cut out the image twice for different paper for the cone and the scoop of ice cream.

Paper: Brazzil Pearl Shimmer, Brazzil Chocolate, Die Cuts with a View Summer Stacker, an old piece of scrap (pink and white checker paper have no idea who manufactured it.)

Ribbon Celebrations Michael’s Brand, Strawberry Cupcake Pink  Baker’s Twin from My Craft Spot.

Button – Random button I had in my stash (acrylic clear flower)

Cuttlebug Folder  – Flower Blossoms 

Glossy Enamel – White

Sentiment – My Pink Stamper

Ink – Stampin’ Up- Early Espresso

Stickles: Bubble Gum

Recipe:

Cricut Cartridge – Rock Princess – Cupcake set at 3.75

Paper: Brazzil Pearl Shimmer, Brazzil Pinkini, Anna Griffin  Peyton Collection (Zebra Print and striped paper) 

Ribbon Celebrations Michael’s Brand for both Wild Animal Print and the hot pink glitter ribbon used behind the cupcake for dots.

Cuttlebug Folder -Happy Birthday

Sentiment – My Pink Stamper

Ink – Stampin’ Up- Early Espresso

Stickles: Bubble Gum – for cherry

MPS- Card Donation/Service Project

My Pink Stamper just placed a call for card donations for an amazing cause.  Today while my little ones were sleeping I made a fun card to send along as well.  This card donation comes close to home since I have a friend that is my age and has a 2-year-old little girl and a 3-year-old little boy who was diagnosed with breast cancer so advanced it moved into her liver a few months ago. It was a miscarriage that brought the finding of her cancer.  The diagnosis is very grim, but she is one of the most amazing people I have ever met.  She was handed back-to-back heartbreak, yet she is fighting for her life in a manner  not many would think any person could.  The level of grace, self-sacrifice,  dignity and strength she has floors me and all those around her.   She has an amazing strength in the Lord and He is there delivering blessings of joy every day.  It is one of the most astonishing things I have ever seen.  

I decided to do an Ice Cream theme since it brings smiles to everyone AND from my understanding, most that under go treatment have a fondness for the treat since it is a soothing blessing to an upset stomach and a mouth full of sores that goes with that process. 

While making this card, I thought of my friend greatly and thought that there will be a woman receiving this very card that more than likely is just like my friend.  Those that battle breast cancer are the most amazing women I have ever met and I was honored to be able to participate in this service project. 

Thank you for coming by and having a piece of more of the serious slice of life’s pie with me today.

Recipe:

Cricut Cartridge – Potpourri Bonus sheet with the Ice Cream Cone setting at 3.75 inches for both shadow and image.  I cut out the image twice for different paper for the cone and the scoop of ice cream.

Paper: Brazzil Very Berry Swiss Dots, Brazzil Pinkini, Brazzil Chocolate, Die Cuts with a View Summer Stacker, an old piece of scrap (pink and white checker paper have no idea who manufactured it.)

Ribbon Celebrations Michael’s Brand, Strawberry Cupcake Pink  Baker’s Twin from My Craft Spot.

Button – Random button I had in my stash (acrylic clear flower)

Cuttlebug Folder -Flower Blossoms 

Glossy Enamel – White

Sentiment – My Pink Stamper

Ink – Stampin’ Up- Early Espresso

MPS Blog Hop Challenge! Wildly Sweet Pinky Pirates!

My Pink Stamper announced a Blog Hop  challenge this past Friday during her fun Pinkalicious Blog Hop.   This was the first Blog Hop featuring the new MPS Design Team!  I have to say I had a great time hopping along it Friday night!  The talent is just amazing and very well-rounded in technique demonstrations and ideas!

I was actually excited about this challenge since it was a two-fold motivation of getting a kick-start on a pending project and participating in a challenge.  Believe it or not I had EVERYTHING to start this project on hand so I got cracking on this Friday night!

I recently volunteered to make banners and cupcake toppers for a daughter of a dear friend’s third birthday.  She gave me a theme and creative licence to run with whatever I wanted to do.  Once I saw the challenge posted by MPS, the light bulb started to glow!  I got to follow the challenge and combined my favorite color scheme (pink, black and “bling”) my favorite technique of incorporating animal print (I LOVE ANIMAL PRINT!) , my favorite Cricut project of creating birthday swag and one of my top fav Cricut Cartridges, Rock Princess – the creative possibilities that cartridge holds is unbelievable.

I just finished the project with two weeks to spare and in the nick of time to meet the MPS deadline.  The project was a bit larger than I anticipated, but I think it will be the perfect proverbial cherry on top for the birthday party!

Thank you for stopping by and sharing a piece of life’s pie with me! 🙂

Recipe (for the banner details, I used Design Studio and it was very complex in demotions and it would take two blog pages to break down, so if you want the exact info, I do have that information, please feel free to contact me directly or leave me a comment.):

  • Cricut Cartridge:  Rock Princess,  Mini Monograms (scallops and cupcake topper base; see cupcake topper base and layers) and Celebrations ( set at 5.5 for banner; find on page ).
  • Cupcake Topper:  Scallop from Mini Monograms set at 2 inches for base.  The next  layer set at 1 3/4 inches.

– Princess Rock Image: Skull Font was set at one and 1/4 inches.  

– Princess Rock plain cupcake image with cross-bones was from the image that cuts both cupcake and cross-bones.  I had to change-up the paper and the font size from each other so there was a bit of waste in that step.  The pink cupcake was set at 1 inch and the cross-bones were set at 3/4 inch.  I then layered them using a pop dot to elevate the cupcake from the cross-bones.   

  • Paper:  Recollections, Michael’s Open Stock embossed and textured paper (Pinkini, Ballet and Very Berry and Shimmer Cream).  Silver Glitter Cardstock from clearance rack at Target ( I used this behind the # 3 on the banner and cupcake “dots”).
  • Ribbon: All Celebrations (Michael’s brand) Hot pink and black 1/2 inch zebra print ( bow for banner),one and 1/2 inch hot pink zebra print (treading for banner), 1/8 inch black satin ribbon (bow for cupcake topper).
  • Accent Pen: Uni-Ball Signo- White (used for dots on scallops and smile on cupcake face)
  • Stickles Diamond (used as an accent on cupcakes on both banner and cupcake toppers and to outline the # 3 on the cupcake toppers).
  • Wilton Lollipop Sticks, Pack of 50 at 4 inches – Michael’s
  • Pop Dots: I used these to add dimension to cupcake toppers under the second layer and I added these to the 3rd layer to the banner.
  • Hot Glue Gun: I used a hot glue gun to attach lollipop stick to topper and to attach the small bow on the cupcake topper with the # 3 on it.

* Please note that I cut off legs and arms of the “cupcake man image” on the one on the banner as well as the one for the cupcake topper.

Again, thanks for stopping by and having a piece of life’s pie pirate cupcakes with me! 🙂

Trying out My New Cartridge: Wild Cards

I just got Cricut’s Wild Cards in the mail and I tested it out on making a quick card for some friends that just bought their first home.  I have to say that I really like this cartridge!  It has a ton of options to customize a piece of you into each creation!  It is worth checking it out.

Recipe:

Cricut Cartridge: Wild Cards set at 7.  I first made the envelope on “fit to page” and then made the card based on that size.

Paper: Die Cuts with a View- Cotton Blossoms and open stock embossed paper from Michael’s (shrubs)

Stickles

Brads – Making Memories

Sentiment: My Pink Stamper

Ink: Stampin’ Up Early Espresso

Stamps and Stickles are for More than Cards and Scrapping!

Stampin' Up Tart and Tangy "Cherry" stamp accents on walls

The hubs and I are building a playhouse ridiculously over- the- top playhouse for our two little girls.  It has been a fun summer project and we should hopefully be done with it by next weekend – just in time for my youngest second birthday.  

The theme of the interior is a cupcake and cherry theme with a small vintage twist that meets a Pottery Barn Kids feel.  I wanted to add some character to the walls and one of the ideas I just executed was bringing my Stampin’ Up and Stickles into this project. 

Once we are done with the house, I will be sure to post the progress pics!

Thanks for stopping by for a piece of pie! 🙂

I stamped it with Stampin' Up Classic Black and then distressed it a bit by wiping with a wet wipe.Painted with craft paint.

Once the paint dried, I then applied X-mas Red and Diamonds Stickles over the areas I painted