I am on a roll with making cards this weekend. I made one for a friend that just got an amazing job at 3M and in this economy, that is something to celebrate and I am attending a double birthday tomorrow for a close family friend’s little girls where the theme is Princess Party.
I have to admit I am still stuck on the faux chipboard concept I learned from My Pink Stamper, so you will see that implemented in the princess themed cards. Plus I needed any excuse to break out my new “Once Upon A Time” Cricut cartridge.


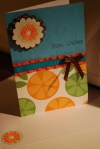
- Used Die Cuts With A View Summer Stacker and Storybook Cricut Cartridge


- Stamps: Stampin’ Up Tart and Tangy and My Pink Stamper

-

- Used Die Cuts With A View Summer Stacker and Stroybook Cricut Cartridge
-
- Stamps: Stampin’ Up Tart and Tangy and My Pink Stamper


-

- Stamps: My Pink Stamper
-

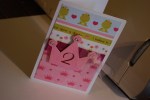
- Paper from Michale’s Individual sale paper- Once Upon a Princess Cricut Cartridge. I used the faux chip board method on the crowns.


