
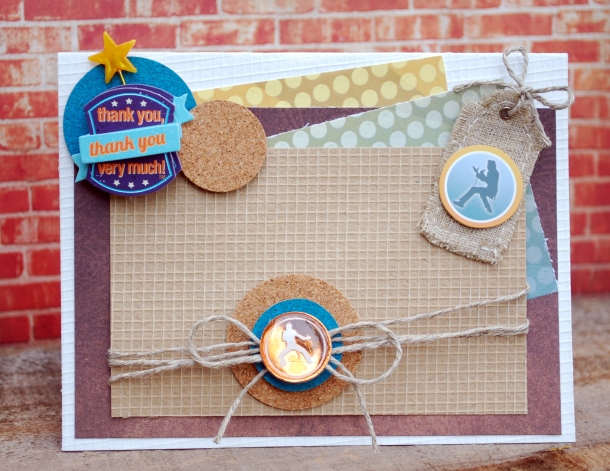
Hi there! Today I have a fun Elvis card up over at Paper House! One day I will get to Graceland, but until then I am sure glad Paper House has a fun Elvis Collection. Pop over and check out how I made this little number!
Linking Up to:
Hi there! Today I have a fun Elvis card up over at Paper House! One day I will get to Graceland, but until then I am sure glad Paper House has a fun Elvis Collection. Pop over and check out how I made this little number!
Linking Up to:

Happy Earth Day folks! Today up over at Kiwi Lane Designs is a fun layout I made with Zero pictures. We were lucky enough to have access to My Mind’s Eye Now and Then Collection and using some new templates I just went nuts making a camping themed page by adding some fun elements with Heidi Swapp’s Color Shine and Xyron Mega Runner and Xyron Dots. Head over and check out more of this page and the C-U-T-E templates that made all this possible!


Until next time,
Arin
Linking up to:

Woot! Today is the day for the Paper House Productions “Hop, Skip & Jump” Kids Blog Hop this weekend! The Design Team has some fun kiddo inspired creations cooked up that you will not want to miss! There are amazing goodies up for grabs that are just must haves for any crafty stash.
How to ENTER:
Easy peasy lemon squeezy just like this fun project I made with the Owls Hoot Collection! All I did was reclaim a tabletop house shaped bookcase I found on clearance for $5 at Target and turn it into a dog house for my kiddo’s American Girl pets! My kiddos love owls so this collection came in handy since I made all their American Girl Doll bedding with owl fabric. Love when crafty kismet happens!

What I did was measure and cut down the design paper and attache using my Xyron Mega Runner and for the ribbon, I cut down American Crafts ribbon ran it though my 5 inch Creative Station and dressed the internal and external edges. I traced out some flower stencils using Kiwi Lane Designs Tiny Accents, inked the edges and ran through my Xyron Creative Station and attached to the roof. I dressed the house with flower accents I had on hand and the collection 3D stickers and Puffy stickers.

Now how is that for turning $5 and some cute crafty supplies into something that will be cherished and played with for many play-times to come?
Now make sure to hop through each designer down the list to be eligible for the most entries! When you’re done, just hop over to Paper House Blog and let us know! The hop will be running all weekend, so you have until Sunday at 11:59pm EST to get your entries in!
Kids’ Blog Hop Designers
Arin Flynn You are here
Up over at Samantha Walker, you can see how I made this cute bunny banner using her Samantha Walker Bunny cut file just in time to greet Mr. Cottontail!

This banner was super easy to make thanks to Pick Your Plum wooden pennants, DCWV Linen Sheets, and only one cut used as a stencil! Having my Xyron Creative Station handy just added to the laziness ease of the project.

I had the help of Hemptique Baker’s Twine to add a little extra bounce in the bunny tail and to be the support of project for holding together the pennants.

I addes some buttons, faux stitching and fabric letters (yes you see them on all my projects! I just love them).

This project was not only super simple and easy to do, but there is something therapeutic about just simply tracing and cutting and with this bunny cut from Samantha Walker, it could not have been any easier. Full tutorial and supply list is up over on Samantha Walker’s Blog!
Supply List:
Hello and Happy Friday! I wanted to share a gift I made for some friend’s anniversary using Paper House Productions Wedding Day Collection , Xyron products, Jamie Cripps 3D Chevron Christmas Gift Card Tag and Lori Whitlock Bottle Label Tag- Big Pocket cut files! It was super easy to put together and yet translates thoughtful effort! One of those tricks that would would like to keep in your back “pocket”! All the details of how I made this is up over at Paper House Productions Blog!

Pocket Gift Card Holder
disclaimer on the Starbucks Card… that is my trusty go-to gift card prop! It is from the first and original Starbucks store… yes I am a little attached

Thanks for sharing a piece of “dressing up the bottle” pie with me!
Happy Hump Day! Xyron is hosting a “Not Xyron, but Should Be” Blog Hop this week. The idea of this blog hop was take craft projects posted on Pinterest where Xyron products could be the star, but was not and make Xyron a star with our own spin on the project. I chose coasters!
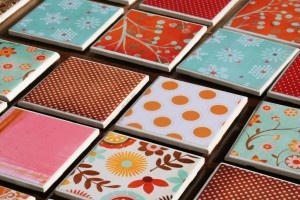
It wasn’t a huge stretch for me since I had some extra limbs laying around from a recent tree removal that I have been wanting to slice up and turn into coasters AND that is exactly what I did!

It was so simple to make by having my Xyron 5 inch Creative Station w Laminate/Permanent Adhesive and Xyron 3 inch Sticker Maker at arms reach!
 Here is how I did it (full supply list provided at the end of this post):
Measure the wood slices and make templates according to the sizes you need (I used my Cricut Expressions and cartridge Plaintain School Book Circle cut). Using cork, burlap, and linen trace and cut out circles.
 Once all circles are cut, run each though the Xryon 3 inch Sticker Maker, burnish, peel and stick on top of the wood slices. Yes! It is that easy! Now you could just stop there, but why . . .?
 Using some favorite scrapbooking paper, punches, ink and stamps and glue to create a fun embellishment for each coaster. I happened to use American Crafts 6×6 Neapolitan paper pad, cut out the mason jars and punched some coordinating circles, inked the edges and uses sentiment stamps from Joy’s Life – Everyday Occasions stamp set.
 Now for the icing on the cake! Take the paper embellishment and run it through Xyron’s 5 inch Creative Station using the Laminate/Permanent Adhesive cartridge.

Burnish,free cut the embellishment, peel off the backing and stick!

This will allow each to stick to the coaster while protecting the paper embellishment from the job hazards of coasters!

Genius right? Not really, but I think it is really cool that Xryon makes products like the Laminating/Permanent Adhesive or my cute coaster embellishments would be soggy before my first refreshing sip.
Supply List:
Linking Up To:
Everyday is an Occasion – Sunday Funday
Happy Spring! As most of the country begins to thaw from the harshness Old Man Winter dealt out this year, I decided my first project for Paper House was putting to use the rustic, bright and cheery Garden Collection!
Combining the collection with a reclaimed old pallet turned picture frame and glittering some wooden letter using my 5 inch Xyron Creative Station, I turned it into something that echoes the sentiments of spring!
Head over to Paper House to check out all the deets!

Happy St. Patrick’s Day! I got my crockpot cookin’ me up some cabbage! Oh my do I have a fun “sneak peek” for you today! As Anna Griffin’s new collection is gearing up for its debut on 24 Hour Craft Day on HSN the Xyron Design Team had the privileged to dive into the new collection and cook up some creative inspirations to share with you this week. Today is my turn and boy did I have fun!

This project may have several components to it, but it came together with ease with the help of my Xyron 5 inch Creative Station, High Tack Tape and 3 inch Sticker Maker (a full supply list is located at the end of the post).

I found a burlap wrapped canvas at Michales and some lace covered burlap and built my base. Then I moved onto the first component of making my mini clothespin wreath.

Using a small wooden embroidery hoop as my base and wooden clothespins I primed them with white craft paint. I measured the strips and cut down the Anna Griffin collection paper. Inked the edges and applied Xyron High Tack Tape to the back of each paper strip, placed on each clothespin and sanded down the edges. I finished this with a lace ribbon.

In making the frame, I applied 3D Enamel Gel from Globecraft and Piccolo to a wooden frame and the “Family” sentiment and allowed time to set and dry. Then I added Anna Griffin collection paper to the back of the frame securing it with Xyron High Tack Tape. Added the sentiment with a quick set glue.

In making the simple but elegant embroidery hoop, I traced, cut and inked a sheet from Anna Griffin collection. I attached the to the wooden embroidery hoop using Xyron’s High Tack Tape along the face of the hoop. I then sanded down the edges and finished it with a lace ribbon.

In making the wooden letter, I primed it with white craft paint. I traced, cut and inked the letter using Anna Griffin collection paper. I then ran it through my Xyron 5 inch Creative Station and attached it to the wooden letter, sanded down the edges and retouched with ink.

In wanting to add a little extra pop to the project, I put to use a burlap rose and two linen buttons I had on hand.
 Using a 1 inch paper circle punch I punched out two circles from the Anna Griffin collection, inked the edges and ran them through the Xyron 3 inch Sticker Maker and applied each to the linen buttons.
 I finished this project by arranging all the components onto the burlap base and used hot glue to attach them.

This was a great project to create and you will not want to miss out on seeing what Anna Griffin has in store for you on March 24th on HSN. Check your local listings, Follower her on Facebook and her blog for more details. AND be sure to head over to Xyron’s Blog each day this week to see what we got cookin’ with Anna Griffin!
Supply List:
Linking to:
Hello and happy Tuesday! Today I am up over at Kiwi Lane Designs showcasing this layout! My first baby is turning six tomorrow and she as my true inspiration for this creative moment. I still can’t believe she is going to be six! I can’t believe I have kept her alive for six years! When she was born I knew NOTHING about babies and I do mean NOTHING. I was very much all thumbs out the gate and could not even keep a plant alive. I did start with a dog before we had kids. My Sadie Dog was such an easy pooch to train and when I needed to I could crate her – probably not the best benchmark for our family planning expectations :-).
Each time I would head into the pediatrician’s office during her infant well baby checks, I would announce to the doctor, “She is 3 months, 4 months a year old. . . and she is still alive!” I was never more terrified of something that only weighed 8lbs. I think the doctor took pity on me and always gave me great words of encouragement and support to weather the storm of being a first time mom sans a mom of my own on speed dial.
Needless to say, this layout is proof that I am slowly figuring out this whole motherhood thing and am loving every minute of it!


Hi and welcome to my first official post for Xyron! Today I am super excited to also be featuring Miss Kate Cuttables during our partnership blog hop week! I am no stranger to Miss Kate Cuttables and have loved doing projects with her clever and super cute cuts. Combining them with Xyron products was just icing on the cake. Below are the cuts I was “lucky” enough to play with for this project! 
Who doesn’t like creating with mason jars? They are cheap, durable and a great starting point to any crafty creation. With the help of my Silhouette, my Xyron 5 inch Creative Station and a little luck I was able to whip up this wee bit of the Irish decor!

Here are the Xyron products I used and this is how I did it (full supply list is located at the end of this post):

I first measured the opening of the mouth of the quart jar to plan out my cut sizes. Then using my Silhouette, I cut out all the components of the project. I wanted each component to be double sided so I copied each cut and flipped it.

Once all cuts are removed from the mat, I began to load all the cuts into my Xyron 5 inch Creative Station and added once each set ran through. I then began to build each cut by layering and placing together.

Using Xyron 3/8 inch High Tack Adhesive Dots, I layered the clouds onto the rainbow.

For the “gold” component of the project, I dusted each side I ran through the Xyron Creative Station with glitter, shook off the excess and repeated on the other side. I then glued each glittered piece together and glued it to the pot.

In preparing the lid, I traced the inside of the lid on chipboard and cut out. I then ran it through my Xyron 5 inch Creative Station attached it to the bottom of the sealing cap and added more adhesive on the top of the chipboard using my Xyron 1/2 inch Mega Runner.

I then cut-to-fit some spare Styrofoam I had on hand. Using a green ink pad, I inked the Styrofoam and then attached the Styrofoam to the chipboard and ran more adhesive on the top of the Styrofoam (this will help the moss to blend and stick well to the Styrofoam) and then put together the lid and set aside.

After cutting down a toothpick and two wooden skewers, I hot glued them to the pot of gold and the rainbow and placed into the lid. Once the rainbow and pot of gold was in place I added the clovers with the adhesive backings created by the Xyron Creative Station. Adding the moss was the final touch before placing in the jar and closing it up. the moss stuck perfectly to the Mega Tape Runner adhesive applied to the Styrofoam.

In finishing the project I wrapped 5/8 inch ribbon around the lid securing it with Xyron 3/8 inch High Tack Adhesive Dots.

There you have it! A fun way to add a bit of Irish luck to your decor. Now head over to the Xyron Blog and Facebook Page and see what else we have cookin’ with Miss Kate Cuttables! Also be sure to head over to the ever-so-talented Shellye McDaniel over at Papered Cottage– she takes CUTE to a whole new level! And don’t forget to visit Miss Kate Cuttables and sign up for their FREE daily cutting file while you are at it too!

Supply List:
Miss Kate Cuttables:
Xyron Products:
Linking Up To:


