RSS Feed

Taking a Stab at Becoming a Prima Ribbonista with May Arts!

Happy weekend all!  Today I am posting in response to round one of May Art’s Design Team Call!  I am super excited about this call and have been waiting for opportunity ever since I spent some time at their booth at 2013 Winter CHA!  To be a Prima Ribbonista would be such an honor so I hope these below projects and tutorial catch their eye enough to advance me to the next round!  Fingers crossed and wish me luck!

Summer Ribbon Wreath Tutorial!

Materials Needed:

  • May Arts Ribbon
  • Wooden flat craft ring (found at any craft supply store)
  • Silk flowers
  • Baker’s Twine
  • Buttons
  • Tapestry Needle
  • Hot Glue
  • Tape
  • Scissors

DSC_6834

Step 1: Wrapping Flat Wooden Ring – Using May Arts ribbon, tape end to the back of the wooden ring and begin to wrap. Once finished hot glue end.

mayarts1

Step 2: Assembling Silk Daises – First pull off stems and pop out plastic center.  Sew button onto the middle of the daisies using a tapestry needle and Baker’s Twine (a tapestry needed works best for pulling through the many layers of the silk flower).

mayarts2

mayarts4

Step 3: Assemble Wreath – Using a hot glue, arrange and attach each daisy to the bottom corner of the wreath.  Then add three coordinating buttons to the top corner for balance.

mayarts5

Step 4: Finishing Wreath – Using a 18-inch of coordinating ribbon, fold in half and loop over the top center of the wreath to form a slip knot. Tie at the top of the ribbon and trim ends.

mayarts 6

Now doesn’t this wreath just scream summer! I already have it hanging on my front door hoping it will encourage the sun to overpower our Southern California “June Gloom”.

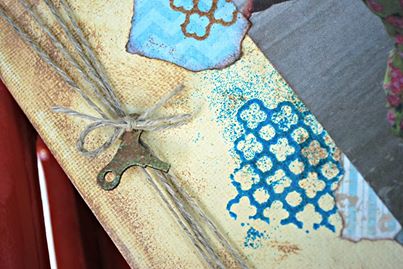
Using ribbon in projects is like icing a cake.  It really finishes the projects and makes them truly appealing. Here are a few more projects where the ribbon certainly adds that needed W-O-W factor!

swpic

DSC_5808

DSC_6841

Thank you for taking a peek at my attempt to become a Prima Ribbonista!

Linking Up:

I Gotta Create- Link Party
Tatertots & Jello- Link party
Too Much Time on my Hands- Link party
I Heart Naptime- Link Party
Everyday is an Ocassion – Sunday Funday! 

Embossing Memories!

Happy Thursday all!  Wow has this week flown by and I have to say that all the while I have been busy, I have been also introduced to a whole new kind of kiddo crud . . . pink eye!  I wish I could say that I was immune to this eye affliction, but not so much. Thankfully, I have a fun sneak peek to share with you of a Father’s Day gift I made for the hubs that is up over at Globecraft & Piccolo as my specks are healing!

The focus this project is using their amazing embossing enamels  in unique and creative ways for memory keepers. I know you have heard me rave about Globecraft & Piccolo’s Embossing Enamels before, but seriously, it is one of those supplies that stands above the rest and is a must-have in your crafty stash!

960056_4756839600216_301272760_n

Head over HERE and check out my project AND let me know what you think by leaving a comment there.  I have a feeling one lucky commenter may have an opportunity of owning some of this out-of-this-world embossing enamel.   Make sure you leave a way to contact you (blog, email, etc)! 🙂

Thanks for sharing a piece of “loving making memories” pie with me.

Jinger Adams All Occasion Card Kit

549034_541247975927154_1604854376_n

Hi all! Today is my day to share a fun project over at Jinger Adams using the newly released All Occasion Card Kit with Pop-Out Cards! This kit is super fun and full of bright colors!  I just love the Pop-Out Cards!  It really takes the guess work out of making creative 3D cards.  The kit is full of great sentiments that make finishing a card super quick and easy, but have such a polished look.

DSC_6512

This kit is something that every crafter should have at arms reach to make quick and very creative cards for any occasion. Head over to Jinger’s Blog and check out all the creative inspirations that the design team has been cookin’ up!

jinger-adams-all-occasion-card-kit-d-20130405110842833~251273 (1)

Thanks for sharing a piece of “loving card kit” pie with me!

Congrats Grad!

DTC-Designer

Happy Wednesday All!  We are rockin’ and rolln’ over here in Southern California this morning with the 5.0 earthquake that hit our coast.  I did not feel it since I was on my morning walk, but those always bring on a bit of a buzz among the local folks.

Today over at Decorate to Celebrate, we are kicking off a new challenge with the theme of Graduation.  Whether if it is your little squirt graduating Kindergarten or your kiddo graduating Medical School, it is cause for celebration and we would love to have you LINK up your project to share.

DSC_6740

The design team has some great inspirations to kick off this challenge and this is what I made for my nephew who is graduation High School tomorrow!  This is the last of the four boys my brother-in-law and sister-in-law have to walk across the High School podium.  My nephew’s gift is music and he was honored with the Louis Armstrong Jazz Award this year, so I used that as a thread to my theme for his banner.

DSC_6741

I cut the base of the banner using my Cricut (had to dust that baby off a bit).  The cart was Country Life cut at 7 inches. I found some cool Lori Whitlock rosettes via the Silhouette Store and I cut those out at 2.8 inches.  The musical notes were a cut from the Silhouette Store as well.   Using some Heidi Swapp Gold Lame Color Shine, I added some shine to the base of the banners. Added some washi tape I got from Paper Issues and Pick Your Plum, I called it done!

DSC_6742

Now be sure to head over and check out all the great inspirations the design team has and LINK up your fun Graduation project!

Thanks for sharing a piece of  “hats off to the Grad” pie with me.

Yum-Yum Time!

DSC_5633

Happy Friday All!  It is Memorial Day Weekend for all of us hard working Americans and this is the time we fire up the grills and dust off the patio furniture to kick off the summer and remember those who paid the ultimate price for the reason we can wave our flags high  from our homes.

With any holiday in this house, food is just a given.  I love to cook as much as I love to craft and I think I love to eat more than both combined! So I will share one of my new favorite summer desserts . . . Very Berry Trifle  made with Cream Cheese Pound Cake.

  1. I found the pound cake recipe via Pinterst of course! Once baked, I separate in half and freeze one half for another trifle.  I slice the half I am using in about inch slices and set aside.
  2. To make the fruit base I prep and slice full container of  fresh strawberries and toss in a sauce with about 1/4 cup of sugar and a vanilla bean I split open.  I cook on simmer until the berries are mushy and all the sugar is disolved, fish out the vanilla bean and then puree it using a stick blender.  Set aside to cool.  I also slice another full container of strawberries and wash a small container of raspberries and set aside
  3. Using an instant vanilla pudding I make the pudding per instruction and add the guts of a vanilla bean (I think you are getting I love vanilla . . . I feel this takes a big place for flavor of the usual Brandy or Cognac that is called in most traditional trifle recipes).  I set in fridge to set up.
  4. As the puree and pudding are processing, I take a half pint of whipping cream and add 1/4 cup of powder sugar and whip together using my stand mixer (hand mixers would work fine as well) until it has nice semi firm peaks.
  5. Using  a trifle bowl (any bowl would work) I begin the layering of the  fresh berries, pudding, puree, pound cake, puree, whipped cream, berries, and (very light layer) white chocolate chips in that order.   Let sit in the fridge for about 2 hours before serving and you got yourself a fresh and very yummy dessert that will be a showstopper!

DSC_5632

Ingredients:

  • For pound cake see recipe HERE
  • 1 half pint whipping cream
  • 1/4 cup powder sugar
  • 1/4 cup white sugar
  • 1 package of instant pudding (make as directed)
  • 2 Vanilla Beans
  • 2 containers of fresh strawberries
  • 1 container of raspberries
  • 1 cup of white chocolate chips (use a good quality brand for best results)

Thanks for sharing a piece of “yum-yum” pie with me!

Linking up to:

Gotta Create – Wildly Original Linking Party

The Real Thing – Real Family Fun #15

Something Sweet Is Cookin’

549034_541247975927154_1604854376_n

Hi all!  First I want to say I am thinking and praying for all the tornado victims and their families in Oklahoma and my heart just goes out to those that were affected by this horrendous storm.  I lived in Dallas, Texas, 14 years ago and I had experienced a few myself, but nothing of this magnitude, so I can’t even imagine what these communities are going through.  I will be thinking of these sweet fellow Americans often.

Today is my first designer post over at Jinger Adams! It is a project that I had the honor of being featured under the bright lights of the HSN studio last month during her new collection launch.  The poor hubs was dragged out of bed at 6 AM to watch her shows with me!  I think that was his first time ever watching HSN!

Here is the sneak peek of something sweet I have cookin’ over at Jinger Adams today!

DSC_6451

Now click HERE and indulge yourself on some amazing must-have scrapbooking and card kits! The design team has been having a lot of fun sharing all kinds of wonderful inspirations using this collection this past week that you will not want to miss as well!

Thanks for sharing a piece of “sharing something sweet” pie with me!

I Feel the Love Project!

img850

Happy Sunday All!

DSC_6732

Well today I am sharing with you a card that I made for a very specific reason!  Sweet Maddison over at I Feel the Love Project is doing an awesome card charity this month that is near and dear to my heart, since it is a dear family friend that is being honored!

Her cause this month is to make a card for a very special dad that has been undergoing some hardships and needs some TLC  to help lift his spirit.  Sadly, my friend Reggie fits the bill.  He is watching his 22 year-old daughter battle a rare form of pediatric cancer for a second time in her life.  The first battle was when she was five and she lost her kidney during that battle.  This time around she is battling an unrelated form of rare cancer with only one kidney.  This is a very close knit family and if one hurts, they all hurt and they are all in it together with Reggie and his wife being the first to carry the burden of it all.

DSC_6737

He has such a positive outlook and and being an Electrician, I thought he would get a kick out of  this card I made using my Silhouette, some twine and great paper from Paper Issues (Glitz- Cashmere Dame), buttons and some random wire I had lying around.  I did some faux stitching and distressed the die cuts and card with Close to My Heart Slate and White Daisy.

DSC_6735

Please head over and check out all the details of this month’s cause and I hope you can find time to LINK up a card for him as a form of encouragement, I would love just overwhelm him with so many cards!

Thanks for sharing a piece of “just crafting for a good friend” pie with me!

Linking Up To:

Paper Issues – Lifestyles to Die For

Everyday is an Occasion – Sunday Funday

I Gotta Create – Wildly Linking Party #52!

Teachers vs Cootie Monsters!

DTC-Designer

Happy Wednesday!  Today over at Decorate to Celebrate do you have a fun challenge that will help bring smiles to educators!  It is a teacher gifts or classroom party challenge.  How perfect is that?  It is getting to the end of the year and many of you all will have to start coming up with ideas for your kiddo’s teacher and class room celebrations!  The design team has a ton of amazing inspirations to glean ideas from!

DSC_6726

Here is what I cooked up.  I am a 100% germ-a-phobe.  I think being so sick for all nine months during both of my pregnancies made it worse, so the thought of the stomach flu hitting our house just sends me into the fetal position.  Having teacher friends that teach in elementary school settings, they are about as bad as me, so I decided that any teacher of small children would love to receive this instead of the traditional apple.

DSC_6727

This was actually so easy to make! I cut down some designer paper from Stampin’ Up and used my ATG to adhere it to the bottle of hand sanitizer.  I then took some ribbon and wrapped it around the bottle and used a Glue Dot to fasten it to the front of the bottle. Now for the fun part!  Heading over the the Silhouette Store, I found this Lori Whitlock tag (Circle Banner) with the pennants on it.  I changed up the size to be around 3 inches around and changed up the colors of the tag layers and pennants.  I then added the little saying I made up using  a font I found at the Silhouette Store.  I grouped together everything and printed out on my color printer and then cut out on my Silhouette!

DSC_6728

How easy was that? You could whip out a ton of these babies in no time flat!  Head over to DTC and check out the inspirations and LINK up your own teacher gift/class room party idea!  I can’t wait to see what you have cooked up!

Thanks for sharing a piece of “keeping the cootie monsters at bay” pie with me!

Linking Up To:

Everyday is an Occasion: Sunday Funday

The Real Thing – Real Family Fun 14

Gotta Create – Wildly Original Linking Party! 

Dreams do Come True!

549034_541247975927154_1604854376_n

Well, do I have some A-M-A-Z-I-N-G news to share.  I have sat on this for a while and I am just bursting with joy to finally get to share this!   I am now one of the  new designer for my favorite crafting celebrity JINGER ADAMS!   Hey, she is the reason I own a Cricut!  She sold the heck out of that little bug to me one night when watching late night TV while I was on bedrest incubating life, and I have followed her ever since!

I had the privileged to meet her this past winter CHA and I was such a goofball with being so star struck!  I could barely talk and had nervous dry mouth, but I was on cloud nine for a month after meeting her (I think there is only one other celebrity that would do that to me and that would be any band member of U2)!  AND now I am on her team!  Dreams do come true!  I still pinch myself to make sure this is really happening! 🙂

Jinger Adams Collection Kits! 

All-Occasion Card Kit

jinger-adams-all-occasion-card-kit-d-20130405110842833~251273

Sweet Tart Scrapbooking Kit

jinger-adams-sweet-tart-scrapbooking-kit-d-20130405110842833~251282

To kick off the announcement of her new product and new team we have planned some amazing giveaways of her Collection Kits! Woot! Woot!  Make sure you follow the new designers blogs and give them a shout out in a comment. There will be a winner announced from each of the blogs!  Also, head over to Jinger’s Facebook page and be sure to LIKE it, you will not want to miss anything that she has cookn’!

Now head over and meet this AMAZINGLY TALENTED group of designers!

Congrats to a Musical Grad!

DSC_6657Happy Monday all!  I can’t believe we are already in May and all that the month of May brings!  Thankfully Fantabulous Cricut Challenge Blog’s challenge lines up with something I needed to scratch off my to-do list! Yay! It is a Graduation inspired project using at least ONE Cricut cut.

I busted out Everyday Pop-Up Cards and cut the cap at 4 inches.  I then headed over to the Silhouette store and found some musical notes and cut them out at 1 1/2 inches.  My nephew is graduating HS this month and he received the Louie Armstrong Jazz Award for all his accomplishments in music while he was at HS.  This kid can play anything he picks up.  Oh to have that talent!

DSC_6658

I found some paper that had music terms from DCWV School Stack and followed the school colors for the cap using Papertreyink.com and DCWV Glitter Stack.  I finished the cap using twine from The Twinery and some CANDi for the tassel and sentiment form My Pink Stamper retired collection with Close to My Heart Slate ink. I hit the notes with gold Sickles!

For the envelope, I just added some of the DCWV paper cutting it down to fit as an insert and punching the top with a MS punch.  I scored the crease and used my ATG to have it stick inside the envelope!  I think it adds a more personal feel to the whole project!

DSC_6661

Easy breezy lemon squeezy  yet it has a lot of personal touches.  Now head over and LINK up your Graduation project using at least ONE Cricut project!

Thanks for sharing a piece of “love making personal cards” pie with me!