RSS Feed

Tag Archives: Pick Your Plum

Oh Boy Banner!

DSC_7569

Nothing gets me more excited that making party decor! Last weekend I had the honor to host one a shower for a dear and close friend.  Since it was at our beloved local Mexican restaurant, I kept the decor low key and simple (which on a side note was such a brilliant idea on my part. I usually spend days prepping for hosting parties to only have to clean again the minute the guests leave and the costs were about the same even after feeding the masses a Mexican buffet!). Anyway, my decor was simple and fun and fit the bill perfectly!

DSC_7571

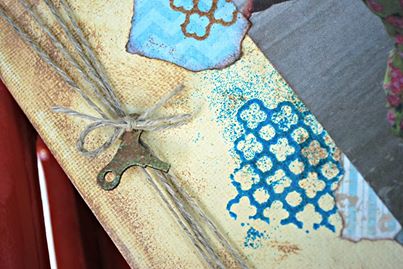
In making the banner, I kind of pulled out the kitchen sink of supplies starting with wood banner pennants I scored from Pick Your Plum and then I found my new love in paper lines, Adornit – Rough and Tough! Adding some clothesline, material burlap, ribbon and embellishing the woodcuts from Adornit and PYP with Heidi Swapp Color Shine and Globecraft and Piccolo Gels.  I cut the lettering with my Cricut using Platin Schoolhouse and ran those and all my layers (yes even the burlap and ribbons) through my 5 inch Creative Station adhesive machine from Xyron.

DSC_7572

DSC_7570

I love when banners come together as easy as this one! It was a hit and a cherished gift for the soon-to-be family of three!

Advertisement

Giving the Gift of Cheer!

Happy Sunday!

DSC_7125

Here is a quick and simple project that you can make as a gift for almost any occasion.  I made this for my neighbors/friends as a warm welcome back from an extended trip. We had been taking care of their kitty while they were away, so it was easy to place this onto their kitchen counter for a cheery welcome home.   DSC_7129

DSC_7127

All I did was pick up a glass water pitcher at Home Goods, found some sunflowers at Trader Joes and thanks to my addiction to Pick Your Plum, I had the chalkboard sticks handy.  I used a white gel pen for the sentiment and inked the edges with stamping ink.  I added some Hemp Cord from Hemptique (love that stuff- such a crafters go-to, something that just adds such a natural and no nonsense feel to a project! did I say I love hemp cord from Hemptique? ) and added some buttons.  For the buttons I ran Hemp Crafter’s Cord from Hemptique for a splash of color.  I used a hot glue gun to secure all the buttons! EASY PEASY!

Thanks for sharing a piece of “sunflower cheer” pie with me.

Embossing Memories!

Happy Thursday all!  Wow has this week flown by and I have to say that all the while I have been busy, I have been also introduced to a whole new kind of kiddo crud . . . pink eye!  I wish I could say that I was immune to this eye affliction, but not so much. Thankfully, I have a fun sneak peek to share with you of a Father’s Day gift I made for the hubs that is up over at Globecraft & Piccolo as my specks are healing!

The focus this project is using their amazing embossing enamels  in unique and creative ways for memory keepers. I know you have heard me rave about Globecraft & Piccolo’s Embossing Enamels before, but seriously, it is one of those supplies that stands above the rest and is a must-have in your crafty stash!

960056_4756839600216_301272760_n

Head over HERE and check out my project AND let me know what you think by leaving a comment there.  I have a feeling one lucky commenter may have an opportunity of owning some of this out-of-this-world embossing enamel.   Make sure you leave a way to contact you (blog, email, etc)! 🙂

Thanks for sharing a piece of “loving making memories” pie with me.

Embossing Powder {LOVE}!

DSC_6640

I have a fun and easy project for you all today by simply pulling together some amazing Globecraft & Piccolo products to make a stunning faux metal key chain! This would make an excellent small personal gift that will dress up any set of keys.

Materials Needed:

Step 1: Embossing Bookboard Pieces – For the square bookboard tag, apply Piccolo Enamel/Embossing Powder and begin to layer Piccolo Turquoise Lagoon and Vintage Copper Embossing Powder heat setting and cooling in between each layer to create a patina effect. Repeat on opposite side.

DSC_6613

Apply Piccolo Enamel/Embossing Powder to the small bookboard charms and dust with Piccolo Real Rust Embossing Powder for the horse and Ruby Red Slipper Embossing Powder for the heart, set with heat, allow to cool and repeat on opposite side.

DSC_6608

Step 2: Punching sentiment with metal punches – Using a 1/8 inch lower case letter metal punch, punch letters into embossed tag using the tap hammer.

DSC_6619

Step 3: Adding charm and sealing –  Once letters are punched, apply a light layer of Glastique Finishing Glaze Gloss using a Q-Tip to the full surface of the tag.  Add charm to the tag and then add additional Glastique to the charm to set and seal.   Allow to dry.

gpkeyap

Step 4: Assembling key chain – Run clear beading cord through bookboard charm and tag and tie a secure knot at the top leaving a 5 inch tail for stringing beads and attaching the key ring. Run a piece of hemp cord through the tag and charm and tie into a bow and trim. Sting desired beads in 2 1/2 inch desired pattern and knot at the end.  Using a  secure and knot tightly the clear beading cord and trim off excess.  Finally run  through key ring.

keychaingp

DSC_6640

Once again, Globecraft & Piccolo’s products deliver a powerful punch when it comes to making projects using their amazing embossing powders.  I just love how these ended up looking like they were made out of metal. They even responded to the metal punches like they were metal.  Be sure to pop over to check out my other fun key chain idea at Globecraft & Piccolo. You can find these and other amazing Embossing Powders HERE!

DSC_6645

Baby Got Subway Art!

DTC-Designer

Happy Wednesday everyone!  Today a new challenge kicks off over at Decorate to Celebrate and the theme is B-A-B-Y Showers!   Sadly I am at a place in my life where my circle of friends are not having first babies, which means NO showers to attend, throw or dream about.  But that does not mean there are not babies to snuggle, smell and love on.  It just means the multiple children effect is happening and our type of showers are now thrown in the hospital room during visiting hours or at their home when you bring them a meal and a small gift . . . so you can hold the baby! 🙂

DSC_6426

I made this for a dear friend who just celebrated the “birth day” of her #5 !  I am hoping I can trade this and a meal for a sweet babe snuggle time party!

Thanks to my Silhouette Cameo, this was a snap to make.  I created the subway art using various fonts and positions and then made sure all were outside cuts and grouped together.  I then cut it out on vinyl I scored from Pick Your Plum!  I burnished it on transfer tape and then burnished on to the finished canvas.

DSC_6428

For the canvas, I wanted to do some bright colors that did not scream B-A-B-Y!  I painted the canvas bright yellow and then found a Silhouette  chevron cut file!   I cut that on standard white 12×12 card stock and then using a sponge, I sponged the red paint on the canvas using the chevron cut as a stencil.   Once that was finished and dried, I headed down to the hubs workshop and hit canvas with a power sander to dull and distress.  Once that was done, I added the vinyl.

DSC_6429

Now be sure to head over to Decorate to Celebrate and check out the fun inspirations the design team has cooked up (word has it, we have some A-M-A-Z-I-N-G guest designers this challenge) and LINK up your fun Baby Shower project!

Thanks for sharing a piece of “babies make you want to decorate to celebrate” pie with me!