RSS Feed

Category Archives: Xyron

A View Fit for an Office – Easy Wall Decor

Hello it is Arin here and if you are joining me from the Xyron Teresa Collins Designs/CardMaker Blog Hop you are in the right place. If not, you will need to head over to the Xyron Blog and see what all the fabulous designers have cooked up using the cute and very versatile collections of Teresa Collins Designs.

What I did was some thing super simple.  In my Teresa Collins box of “happy mail” I scored the” You Are My Happy” collection and her Basically Essential stencils and combining it with Xyron’s Double Sided High Tack Tape, I decided to cook me up some wall art for the office.

Wall Art

Here is how I did it!

First I took a 8×10 wooden wall plaque base and painted it white and lightly sprayed a paper towel with Heidi Swapp Color spray and rough covered the wooden plaque.

DSC_7775

Then I measured out and cut the 12×12 “You are My Happy- Spectacles Paper”. Using some washi tape, I taped down the 8×10 stencil over the design paper.

DSC_7773

Using some Heidi Swapp Color Shine, I lightly sprayed the surface and allowed some time to set and dry. Once I carefully removed the stencil, I used some wet wipes and cleaned up perfectly.DSC_7773

wall art close up

Using Xyron Double Sided High Tack Tape, I applied it to the 8×10 painted wooded base and then secured the altered design paper pressing down gently to smooth out. I am telling you this top sheet isn’t going anywhere! That stuff sticks better than anything I have used! One of those products were if you have issues with commitment, you better shy away! 🙂

DSC_7776

I then sanded down and inked the edges using Close to my Heart Slate ink pad.

DSC_7777

DSC_7778

Wall Art with edging done

I know you see me say, “There you have it! Easy peasy!” all the time, but seriously, you could not get any easier for something that will add some fun whimsy to any wall.

Supply List:


Advertisement

Thank You, Thank You Very Much Card

PHP_ArinBanner


Hi there!  Today I have a fun Elvis card up over at Paper House!  One day I will get to Graceland, but until then I am sure glad Paper House has a fun Elvis Collection.  Pop over and check out how I made this little number!

Elvis Thank You Card 1

Linking Up to:

Paper Issues Pitch Perfect

It is All About the Kiddos Hop!

Kids Blog Hop

Woot!  Today is the day for the Paper House Productions “Hop, Skip & Jump” Kids Blog Hop this weekend! The Design Team has some fun kiddo inspired creations cooked up that you will not want to miss! There are amazing goodies up for grabs that are just must haves for any crafty stash.

How to ENTER: 

  • by liking us on Facebook
  • AND commenting on each of our designers’ posts! If you do, you’ll get +10 entries into our drawing!

Easy peasy lemon squeezy just like this fun project I made with the Owls Hoot Collection!  All I did was reclaim a tabletop house shaped bookcase I found on clearance for $5 at Target and turn it into a dog house for my kiddo’s American Girl pets!  My kiddos love owls so this collection came in handy  since I made all their American Girl Doll bedding with owl fabric. Love when crafty kismet happens!

American Girl Doll Pet House

What I did was measure and cut down the design paper and attache using my Xyron Mega Runner and for the ribbon, I cut down American Crafts ribbon ran it though my 5 inch Creative Station and dressed the internal and external edges.  I traced out some flower stencils using Kiwi Lane Designs Tiny Accents, inked the edges and ran through my Xyron Creative Station and attached to the roof. I dressed the house with flower accents I had on hand and the collection 3D stickers and Puffy stickers.

American Girl Doll Pet House2

Now how is that for turning $5 and some cute crafty supplies into something that will be cherished and played with for many play-times to come?

Now make sure to hop through each designer down the list to be eligible for the most entries! When you’re done, just hop over to Paper House Blog and let us know! The hop will be running all weekend, so you have until Sunday at 11:59pm EST to get your entries in!

Kids’ Blog Hop Designers

Larissa Heskett

Irit Shalom

Kim Kendell

Christine Meyer

Arin Flynn You are here

Susie Bentz

Bev Code

Giorgia Rossini

Erin Reed

Linda Auclair

Vino Dressed to Impress

PHP_ArinBanner

Hello and Happy Friday! I wanted to share a gift I made for some friend’s anniversary using Paper House Productions Wedding Day Collection , Xyron products, Jamie Cripps 3D Chevron Christmas Gift Card Tag and Lori Whitlock Bottle Label Tag- Big Pocket cut files! It was super easy to put together and yet translates thoughtful effort! One of those tricks that would would like to keep in your back “pocket”!  All the details of how I made this is  up over at Paper House Productions Blog!

Wine Bottle gift 1

Pocket Gift Card Holder

disclaimer on the Starbucks Card… that is my trusty go-to gift card prop! It is from the first and original Starbucks store… yes I am a little attached

collage

Thanks for sharing a piece of “dressing up the bottle” pie with me!

Not Xyron but Should Be Blog Hop

Happy Hump Day!  Xyron is hosting a “Not Xyron, but Should Be” Blog Hop this week.  The idea of this blog hop was take craft projects posted on Pinterest where Xyron products could be the star, but was not and make Xyron a star with our own spin on the project.  I chose coasters!

Pinterest Inspired Project

480d99d620aefe2498ff2921dd4d2757

It wasn’t a huge stretch for me since I had some extra limbs laying around from a recent tree removal that I have been wanting to slice up and turn into coasters AND that is exactly what I did!

DIY Coasters w tag

It was so simple to make by having my Xyron 5 inch Creative Station w Laminate/Permanent Adhesive and Xyron 3 inch Sticker Maker at arms reach!

DIY CoastersHere is how I did it (full supply list provided at the end of this post):

Measure the wood slices and make templates according to the sizes you need (I used my Cricut Expressions and cartridge Plaintain School Book Circle cut).  Using cork, burlap, and linen trace and cut out circles.

XyronCoasters1Once all circles are cut, run each though the Xryon 3 inch Sticker Maker, burnish, peel and stick on top of the wood slices.  Yes! It is that easy! Now you could just stop there, but why . . .?

Xyroncoasters2
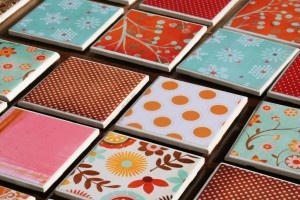
Using some favorite scrapbooking paper, punches, ink  and stamps and glue to create a fun embellishment for each coaster. I happened to use American Crafts 6×6 Neapolitan paper pad, cut out the mason jars and punched some coordinating circles, inked the edges and uses sentiment stamps from Joy’s Life – Everyday Occasions stamp set.

Xyroncoaster3Now for the icing on the cake! Take the paper embellishment and run it through Xyron’s 5 inch Creative Station using the Laminate/Permanent Adhesive cartridge.

DSC_7710

Burnish,free cut the embellishment, peel off the backing and stick!

Xyroncoaster4

This will allow each to stick to the coaster while protecting the paper embellishment from the job hazards of coasters!

DSC_7716

Genius right?  Not really, but I think it is really cool that Xryon makes products like the Laminating/Permanent Adhesive or my cute coaster embellishments would be soggy before my first refreshing sip.

Head over and check out the other amazing projects they are cooking up along this blog hop HERE!

Supply List:

Linking Up To:

Everyday is an Occasion – Sunday Funday


How Does Your Garden Grow?

PHP_ArinBanner

Happy Spring! As most of the country begins to thaw from the harshness Old Man Winter dealt out this year, I decided my first project for Paper House was putting to use the rustic, bright and cheery Garden Collection!

Combining the collection with a reclaimed old pallet turned picture frame and glittering some wooden letter using my 5 inch Xyron Creative Station, I turned it into something that echoes the sentiments of spring!
Head over to Paper House to check out all the deets!

Paper House Productions Garden Decor 1

Burlap Meets Anna Griffin & Xyron!

Happy St. Patrick’s Day! I got my crockpot cookin’ me up some cabbage! Oh my do I have a fun “sneak peek” for you today! As Anna Griffin’s new collection is gearing up for its debut on 24 Hour Craft Day on HSN the Xyron Design Team had the privileged to dive into the new collection and cook up some creative inspirations to share with you this week.  Today is my turn and boy did I have fun!

Burlap Home Decor using Anna Griffin and Xyron

This project may have several components to it, but it came together with ease with the help of my Xyron 5 inch Creative Station, High Tack Tape and 3 inch Sticker Maker (a full supply list is located at the end of the post).

Xyron products

I found a burlap wrapped canvas at Michales and some lace covered burlap and built my base.  Then I moved onto the first component of making my mini clothespin wreath.

DSC_7666

Using a small wooden embroidery hoop as my base and wooden clothespins I primed them with white craft paint. I measured the strips and cut down the Anna Griffin collection paper. Inked the edges and applied Xyron High Tack Tape to the back of each paper strip, placed on each clothespin and sanded down the edges. I finished this with a lace ribbon.

xryon 1

In making the frame, I applied 3D Enamel Gel from Globecraft and Piccolo to a wooden frame and the “Family” sentiment and allowed time to set and dry. Then I added Anna Griffin collection paper to the back of the frame securing it with Xyron High Tack Tape.  Added the sentiment with a quick set glue.

DSC_7667

In making the simple but elegant embroidery hoop, I traced, cut and inked a sheet from Anna Griffin collection. I attached the to the wooden embroidery hoop using Xyron’s High Tack Tape along the face of the hoop. I then sanded down the edges and finished it with a lace ribbon.

DSC_7668

In making the wooden letter, I primed it with white craft paint.  I traced, cut and inked the letter using Anna Griffin collection paper. I then ran it through my Xyron 5 inch Creative Station and attached it to the wooden letter, sanded down the edges and retouched with ink.

DSC_7671

In wanting to add a little extra pop to the project, I put to use a burlap rose and two linen buttons I had on hand.

DSC_7670
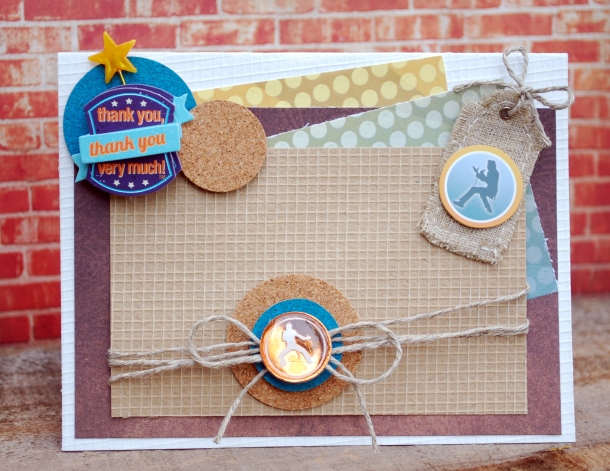
Using a 1 inch paper circle punch I punched out two circles from the Anna Griffin collection, inked the edges and ran them through the Xyron 3 inch Sticker Maker and applied each to the linen buttons.

xyron2I finished this project by arranging all the components onto the burlap base and used hot glue to attach them.

Burlap Home Decor using Anna Griffin and Xyron

This was a great project to create and you will not want to miss out on seeing what Anna Griffin has in store for you on March 24th on HSN.  Check your local listings, Follower her on Facebook and her blog for more details. AND be sure to head over to Xyron’s Blog each day this week to see what we got cookin’ with Anna Griffin!

Supply List:

Linking to:

Xyron Blog Hop Day 3 – Jar O’ Luck

miss kate cuttables banner

Hi and welcome to my first official post for Xyron! Today I am super excited to also be featuring Miss Kate Cuttables during our partnership blog hop week! I am no stranger to Miss Kate Cuttables and have loved doing projects with her clever and super cute cuts. Combining them with Xyron products was just icing on the cake. Below are the cuts I was “lucky” enough to play with for this project!  template

Who doesn’t like creating with mason jars? They are cheap, durable and a great starting point to any crafty creation.  With the help of my Silhouette, my Xyron 5 inch Creative Station and a little luck I was able to whip up this wee bit of the Irish decor!

St. Patty Day Mason Jar Decor

Here are the Xyron products I used and this is how I did it (full supply list is located at the end of this post):

DSC_7597

I first measured the opening of the mouth of the quart jar to plan out my cut sizes. Then using my Silhouette, I cut out all the components of the project.  I wanted each component to be double sided so I copied each cut and flipped it.

DSC_7600

Once all cuts are removed from the mat, I began to load all the cuts into my Xyron 5 inch Creative Station and added once each set ran through.  I then began to build each cut by layering and placing together.

pic1

Using Xyron 3/8 inch High Tack Adhesive Dots, I layered the clouds onto the rainbow.

PicMonkey Collage

For the “gold” component of the project, I dusted each side I ran through the Xyron Creative Station with glitter, shook off the excess and repeated on the other side.  I then glued each glittered piece together and glued it to the pot.

pic2

In preparing the lid, I traced the inside of the lid on chipboard and cut out. I then ran it through my Xyron 5 inch Creative Station attached it to the bottom of the sealing cap and added more adhesive on the top of the chipboard using my Xyron 1/2 inch Mega Runner.

pic 6

I then cut-to-fit some spare Styrofoam I had on hand. Using a green ink pad, I inked the Styrofoam and then attached the Styrofoam to the chipboard and ran more adhesive on the top of the Styrofoam (this will help the moss to blend and stick well to the Styrofoam) and then put together the lid and set aside.

pic5

After cutting down a toothpick and two wooden skewers, I hot glued them to the pot of gold and the rainbow and placed into the lid. Once the rainbow and pot of gold was in place I added the clovers with the adhesive backings created by the Xyron Creative Station. Adding the moss was the final touch before placing in the jar and closing it up. the moss stuck perfectly to the Mega Tape Runner adhesive applied to the Styrofoam.

pic 7

In finishing the project I wrapped 5/8 inch ribbon around the lid securing it with Xyron 3/8 inch High Tack Adhesive Dots.

pic8

There you have it! A fun way to add a bit of Irish luck to your decor.  Now head over to the Xyron Blog and Facebook Page and see what else we have cookin’ with Miss Kate Cuttables! Also be sure to head over to the ever-so-talented Shellye McDaniel over at Papered Cottage– she takes CUTE to a whole new level! And don’t forget to visit Miss Kate Cuttables  and sign up for their FREE daily cutting file while you are at it too!

St. Patty Day Mason Jar Decor

Supply List:

Miss Kate Cuttables:

Xyron Products:

  • Quart Jar
  • American Crafts 12×12 Tropicals and Neutrals card stock
  • Globecraft and Piccolo Pure Sparkle Glitter
  • Ashland Moss
  • Celebrate It 5/8 inch Ribbon – St. Patrick’s Day
  • Chipboard
  • Styrofoam
  • Scotts Quick Dry Adhesive
  • Hot Glue
  • Skewers (2)
  • Toothpick (1)

Linking Up To: 

Paper Issues – Tip-Toe Through the Tulips

Everyday is an Occasion Sunday Funday

Oh Boy Banner!

DSC_7569

Nothing gets me more excited that making party decor! Last weekend I had the honor to host one a shower for a dear and close friend.  Since it was at our beloved local Mexican restaurant, I kept the decor low key and simple (which on a side note was such a brilliant idea on my part. I usually spend days prepping for hosting parties to only have to clean again the minute the guests leave and the costs were about the same even after feeding the masses a Mexican buffet!). Anyway, my decor was simple and fun and fit the bill perfectly!

DSC_7571

In making the banner, I kind of pulled out the kitchen sink of supplies starting with wood banner pennants I scored from Pick Your Plum and then I found my new love in paper lines, Adornit – Rough and Tough! Adding some clothesline, material burlap, ribbon and embellishing the woodcuts from Adornit and PYP with Heidi Swapp Color Shine and Globecraft and Piccolo Gels.  I cut the lettering with my Cricut using Platin Schoolhouse and ran those and all my layers (yes even the burlap and ribbons) through my 5 inch Creative Station adhesive machine from Xyron.

DSC_7572

DSC_7570

I love when banners come together as easy as this one! It was a hit and a cherished gift for the soon-to-be family of three!

Sticking to Crafting!

524049_10150857700548745_275836723_n

Setting: Me at the school bus pick-up in my yoga pants and T-shirt (yes, I have to rub in the fact I live in Southern California and it is February, however the tables will turn when you all can flush your toilets, water your lawns and have drinking water and we don’t in a few months).

The phone rings and as I am greeted by an ever-so-chatty-happy 5-year-old, I let it go to voice mail. Once in the car, I check my messages and it is from crafting guru Beth Kingston from Xyron. Of course I don’t waste time listening to the message and called the official spokesperson and face of Xyron, Beth Kingston back. She answered and I lost all intelligent thought process and morphed into a modern day crafting troglodyte. I am pretty sure she offered me a gig I applied for on the Xyron design team, because I accepted regardless if she did.

Apparently, they have not “fixed the glitch” and I am really not dreaming so I am super excited to announce I am officially a Xyron girl! Last night my head was so in the clouds that I burned dinner and my house could have caught on fire and I would not have noticed.

Today I am back to the “glamorous” duties of being a SAHM ,but with a huge smile and BIG skip in my step and beyond honored to have my name among the below talent.

Xyron Design Team

Jessica Barnett – special projects
Gini Cagle
Sharon Callis – international
Jenn Cochran

Ann Corbiere-Scott – special projects
Arin Flynn
Rhea Freitag
Virginia Fynes – international
Denise Hahn
Theresa Harris
Cristal “Pinky” Hobbs
Angela Holt
Karen Jiles
Shellye McDaniel
Shannon Morgan
Stacy Rodriguez
Laurel Seabrook – international
Katie Skiltin – international
Lori Williams
Yvonne Yam – international