RSS Feed

Category Archives: Pie’s Craftiness

Thank You Berry Much!

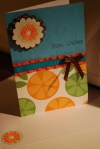
I had to make a slew of cards the other night and I came up with an easy yet cute card that went super quick.  I may add this to my Christmas gift packs.  I got the original idea from My Pink Stamper in one of her tutorial videos making a cherry card and I have run with it since.  Thank you MPS!   If you have not had a chance to check out her videos, they are worth pouring yourself a cup of joe, adding a little “rat poison” (that is what I call my favorite creamers I tell my hubby that I am just taking off the bad years while I pour that into my cup of joe) and sit a spell and enjoy getting some neat ideas and tips. 

Recipe

Cricut Cartridge: Storybook  (scallop set at 2.5)

Cricut Cartridge: Mini Monogram (dot circle set at 1 3/4)

Paper: Fruit paper pack from Michael’s

Michael’s Textured open stock lime green and white paper

Card Base: iCraft blank cards from Michael’s Dollar Bin

Ribbon: Celebrations – Michael’s dollar bin

Stamp: Stampin’ Up Tart and Tangy

Ink: Martha Stewart’s Craft markers: Flamingo Pink and Lime Green

Stickles: Bubble Gum and Diamonds ( I used these to mark the seed marks on the berries and fill in the dots on the circle)

Punch: Fiskers Water wave


Happy Birthday Hubby!

Yesterday was the hubs birthday.  Here is a little something I whipped out for a card for him.  He loved it.  My 3-year-old and I made homemade cupcakes with cream cheese cupcakes.

Recipe:

Cricut Cartridge : Handy Man (Measuring Tape set at 3 inches)  and Mini Monograms (S stitch set at 1 1/2)

Card Base: iCraft – blank brown circle card

Die Cuts with a View:  Summer Stacker for “Happy Birthday” and Glitter Stacker for orange glitter paper

Recollections for base colors

Stickles for the bling outline

Button (from my personal stash)

Button twine from Papertreyink.com

Sentiment: My Pink Stamper

Ink: Michael’s Dollar Bin special:-)

I Feel The Love Call For Cards From Funky Cards

There is this amazing young lady from, Funky Cards,  that has an opportunity for crafters to make a special card for a person/family going through challenging times.  This is my contribution to her “I Feel the Love Project“.  Thank you Funky Cards for this amazing opportunity to touch such a wonderful little girl and her family. 

This project touches me especially since I was a nanny for a family, while in college, that had a little girl who was in treatment and recovery stages of having a brain tumor that came back twice.  She was 18 months when I started and I got to be a part of her treatment plans (PT/OT, removal of feeding tubes and central lines), learning to walk, sing, play, and most of all be in remission.  She is now almost 18 years of age!  Many special prayers and thoughts go to Marley and her family!

Recipe:

Cricut Cartridges:

  • Storybook – Scallop  (1 and 3/4 inch)
  • Walk In My Garden – Daisy Flower (2.5 inches)
  • Create a Critter – Monkey (3 inches)

Paper:

  • Die Cuts with a View – Glitter Stacker (flower)
  • Die Cuts with a View – Animal Crackers (both bases for the card – both 3 inches long and 4 inches wide)
  • Recollections  – Standard Neutral textured pack – Monkey (Can get at Michael’s)
  • Michael’s single sheet embossed paper – Leaf (Scallop)

Ribbon:

  • Animal Print – Michael’s dollar bin
  • Small Pink for bow – Michael’s dollar bin

Uni-ball White Pen from Stampin’ Up

Card Base – iCraft (packages of blank cards with envelopes in 8 packs I found in Michael’s dollar bin.

Stamps – Peachy Keen – Everyday Faces

Ink- Stampin’ Up – Classic Black

Thank you VERY much for visiting for a piece of life’s pie!

A Bug for My VW

So, I must admit, I am in love with my Cricut Expressions.  Since I am already on a kick with vinyl, I decided to make  a vinyl sticker for my back car window of the Criuct mascot.  I think he turned out pretty cute!   This was the first time I ever cut vinyl on my Cricut and it cut like BUTTER!  Super easy and fun project!

Recipe:

  • Cricut Cartridge: Potpourri Basket
  • Settings: Blade 5, pressure high,  speed medium size 4 1/2 inches.
  • Lime Green Outdoor Vinyl from http://www.expressionsvinyl.com/(it was $1.49   a 12×12 sheet – a total steal!)
  • Cricut Design Studio (totally not necessary to have.  I just got it and this was the first project I did with it) – The size of the  Cricut Mascot is about 4 1/2 inches. 
  • I did have transfer tape on hand, but did not need it – it may have made placing the eyes simpler.

Using Vinyl as Stencils

I kind of came across this idea by a “forced” situation.    I originally purchased a saying to go in my stairwell via Ebay.  I had it up and all was well until about six months ago when the vinyl no longer was sticking.  Since we are wrapping up on our full remodel, I know that I put the vinyl down on new construction and paint (the vinyl was also heavy duty outdoor quality).  It should have been stuck amazingly well… too well.   I contacted the seller and that went nowhere. 

I decided to take things into my own hands and trace the outline of each letter/character myself with a pencil, peeled off the vinyl and then paint it by hand.  How hard could that be?   Famous last words . . .

It was not hard, just VERY time-consuming and a bit physically challenging since I had to have the hubs make me a platform I could use to place a ladder on so I was not reenacting any scene from Cirque du Sole while using a ladder. 

The size of the project is about 3 feet long and 18 inches wide.  It took about 5 hours to complete from start to finish (I broke it up in 1 1/2 – two-hour increments each day).  I used regular craft paint from JoAnn’s. 

The walls have a heavier “orange peel” texture to it so it made tracing and painting a bit more challenging than  if it wa a smooth wall.  I had to do some touch up with the base color of the walls, but all in all I am pretty happy on how it turned out AND  to be off the ladder in my 20 foot stairwell. 

What I am excited about is now that I have done this, I can now use my Cricut and make vinyl stencils (indoor quality does not stick as strong for easy peeling back off) and do more projects; one in particular is doing some wall designs for the playhouse we are building for my girls. . . more to come on that!

Design Call For My Pink Stamper!

Yes, even though I am a neophyte in this whole wonderful world of “blografting” (blogging about crafting – my total made up word).  I have decided that I would jump out on a ledge and apply for one of the coveted spots of the My Pink Stamper Design Team.  The competition is steep and I am in awe of the talent and passion I am finding as I dig deeper into the world of “blografting”. 

The assignment is to make a card or scrapbook page using my fav Cricut cartridge and the colors: orange, turquoise, green and brown.  Right now I am in LOVE with animal prints and that is a good thing since they are very much “in” right now. 

This week I was thumbing through the Hanna Andersson catalogue and it was full of the cutest clothes that were animal print. That inspired me to go out on a ledge and do a card incorporating animal print and flowers.


Recipe:

  • Card Base:  I lucked out and found blank 4×6 cards with envelopes in the dollar bins at Michael’s in sets of 8 so I have been using those as a base.
  • Paper: Anna Griffin  Peyton Collection (leopard print), Michael’s individual sheets for purchase (turquoise bubble paper), Die Cuts with a View Glitter Stacker (orange) and Die Cuts with a View Cotton Bloom Stack.
  • Cartridge: Walk in my Garden
  • Ribbon: turquoise grosgrain ribbon I got off Ebay years ago and a brown dainty ribbon I had in my stash I have for years.
  • Sentiment from My Pink Stamper: Simply Sweet Occasions
  • Stamp Ink: Stampin’ Up Early Espresso
  • Flower:  Daisy on “Blackout setting” at 3 inches for both flower and components
  • Leopard paper was cut 2.5 inches in height and 6 inches in length. 
  • Green cardstock from Cotton Bloom Stack was cut to 1.5 inches in height and 6 inches in length.
  • I did the “cheater” method with the ribbon attachment (taping the end of the ribbon to the back of the paper)
  • Dimensionals were used for the orange glitter flower and the smaller circle in the middle of the flower.
  • Hot glue was used to attach the bow.
  • I added a final embellishment of “bling” to the flower and ribbon. Self adhesive rhinestone strips by Recollections.

I had a blast creating something very simple that is super flirty, trendy and fun.  The cherry on top of this fun creation is that it will be mailed out next week to thank my sister-in-law for a ton of hand-me down books for my kiddos.

Quick Cards and Fun Cards

I am on a roll with making cards this weekend.  I made one for a friend that just got an amazing job at 3M and in this economy, that is something to celebrate and I am attending a double birthday tomorrow for a close family friend’s little girls where the theme is Princess Party. 

I have to admit I am still stuck on the faux chipboard concept I learned from My Pink Stamper, so you will see that implemented in the princess themed cards.  Plus I needed any excuse to break out my new “Once Upon A Time” Cricut  cartridge.

Used Die Cuts With A View Summer Stacker and Storybook Cricut Cartridge
Stamps: Stampin’ Up Tart and Tangy and My Pink Stamper
 

4th of July Pillow Case Dresses

This was my first ever attempt to make clothing and believe it or not I surprised myself on how easy these were.  Don’t ge me wrong, the  first dress took me three hours, but  then the second dress only took my about an hour and a half and trust me I DO NOT KNOW HOW TO SEW!  I am self- learning and I will say the worst part of the whole thing was trying to figure out the pattern – I felt that passing the Civil Service Exam would have been easier. 🙂

They turned out really cute and my girls loved wearing them in the local Push and Pull’em Parade on the 4th.

Pattern:  Simplicity

Material: Jo-Ann’s novelty material that was 50% off (I got 2.5 yards)

Ribbon: Satin 2.5 inch wide  (I got 4.5 yards)

Each dress cost $6.50  including the pattern.

Fun Boy Card!

Again like usual I was stumped on making a “boy” card.  Having two little girls that are nothing but the essence of pink and frills, finding that inner tomboy I once knew when I was a little girl (yes I was a tomboy!) seems to have become a challenge:

Again I used the base of the card of the $ bin find I found a Michael’s:

Supplies:

Cricut Cartridges: Potpourri (baseball and fireball) and Celebrations (#7)

Paper:  Stander black smooth card stock for base (Reflections) and the glitter paper came from Die Cuts with A View Glitter Stacker

Stamps:  Whimsical lower case alphabets from Stampin’ Up

Ink: Chalk Ink (white) from the $ bin from Michael’s.

A Hip Cowgirl Kind of Card

I just made this card per request for a hip cowgirl that is named Jane (hence the “J”).

Supplies:

Cricut Cartridges:  Create a Critter (under horse setting size 3 inches) and Storybook (scallop) – Shift/Shadow/M size 2 inches and 1 1/2

Paper: Michael’s bulk  individual sheet for the embossed light pink daisy

Paper: Zebra print and solid dark pink – Anna Griffin Payton Collection Stack – Michael’s

Stamps:  Stampin’ Up whimsical lower case alphabet

Stamp Ink: Stampin’ Up Classic Black

Card Base:  $ bin at Michael’s.  They came in sets of 8 with envelopes.

Ribbon.  Celebrations line from Michael’s.

I used the faux chipboard technic from My Pink Stamper for the horse shoe and added “bling” on the nail cutouts.