
Happy Saturday! Welcome to the A Lovely Blog Hop, hosted by the sweet and ever lovely Jill from Every Day is an Occasion! I am so thrilled to be hopping along with these fabulously talented ladies and I hope you will hop along to see some of the A-M-A-Z-I-N-G Valentine inspired projects! If you just joined us, please click HERE to start from the beginning If you came from Kelsie Ann from Cut Craft Create, you are in the right place!
What I have cookn’ for you today is a two part project! The first part is a super easy and clean way to express your Valentine cheer . . . Homemade soap! If I knew it was this easy, I would have been doing this for years! I actually had the kiddos help in making a few batches. The second is a super sweet and simple two piece box cut from Samantha Walker’s stash of amazing Silhouette designs.

Now before you check out the tutorials below and hop on over to Court from Court’s Craft Corner, up for grabs is some fun blog candy!
To win you need to:
- Leave a comment
- Are subscribed to this blog
- and LIKE my Facebook Page
I will be announcing the randomly picked winner via my blog and Facebook page 2/14/2013! Who does not love WASHI TAPE? These four amazing designs are from Paper Issue’s Esty store and could be yours!
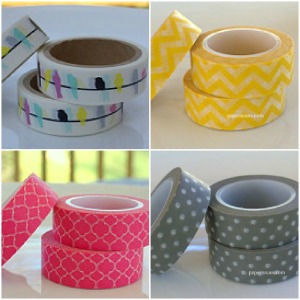
Hot Pink Quatrefoil Washi Tape
Yellow Chevron Washi Tape
Grey and White Polka Dot Washi Tape
Are Those Aqua Birds on That Wire Washi Tape
Yellow Chevron Washi Tape
Grey and White Polka Dot Washi Tape
Are Those Aqua Birds on That Wire Washi Tape
Now on to the tutorials!
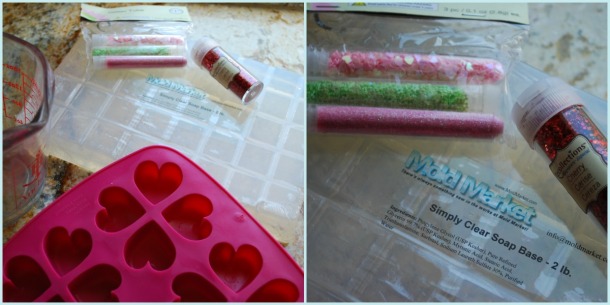
For the soap: I found the 2 lb scored clear glycerin soap brick on Ebay. It is made in the USA. It was around $7, but shipping was about the same. YIKES! However, a little goes a long way, so you get your money’s worth. I found a how-to example on Pinterest, but I decided to document how I did this, since I was using different tools.
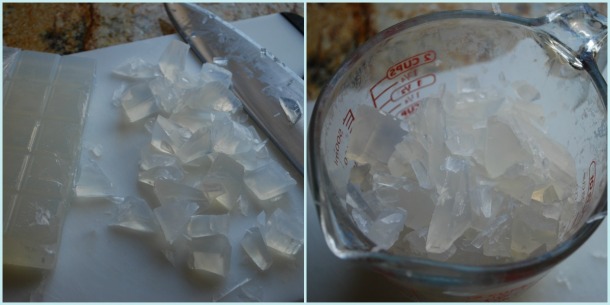
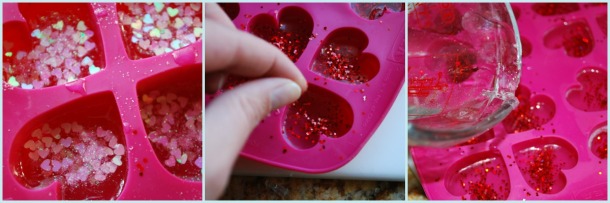
First I cut up the glycerin soap only using two scored rows and chopped coarsely (the original tutorial said it breaks apart easily with your hands, that was so not the case with my brick. That stuff was hard as a rock!). I found that two rows makes one batch using my mold. I then added the chopped pieces to a glass measuring cup and microwaved it to melt it down in 3-4 ten second intervals stirring it each time (you really need to babysit this part, but what is 40 seconds of babysitting?).
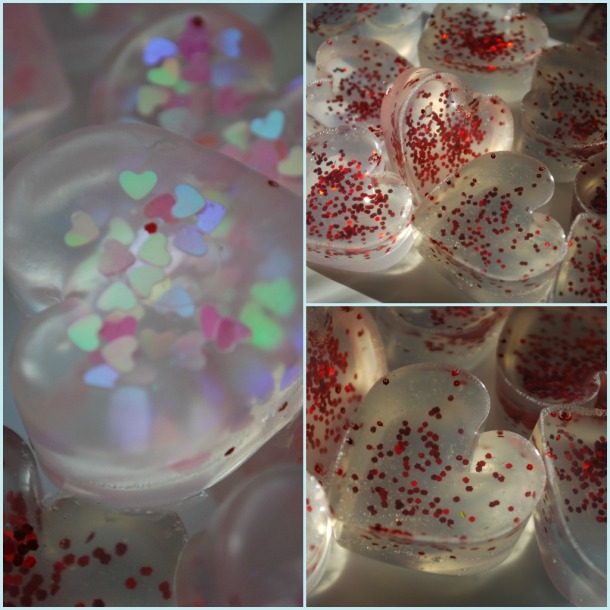
I then pulled out my silicone heart mold I found at IKEA for $1 and poured the melted soap into the mold at a little under a half. I then added Recollections Berry Red Course Glitter for one batch and then some $ Bin find heart shaped glitter for the second batch. You need to move quickly, because it sets up fast. Once glitter was added, I then allowed for it to harden just for about a minute and then topped off each heart with the melted glycerin.
It takes about 15 minutes to completely set. All you do is pop them out of the mold and they are done! Easy peasy!
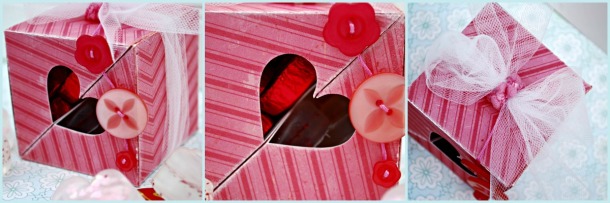
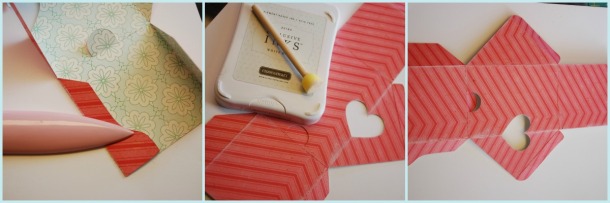
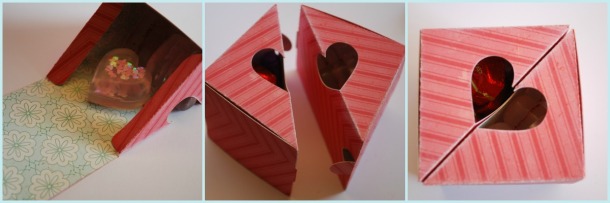
For the box: You can find the Pair of Hearts cut over at Silhoutte, click HERE! It imports to your screen with both boxes fitting on one 12×12 piece of card stock (I used the stock size that it was imported in and was super happy with the size- it was nice not to have to mess with re-sizing for a quick project). When doing a test cut I found that I needed to make sure to use a thicker design paper due to needing more structure; I used Crate Paper, Little Bo Peep. I placed the side of the paper I wanted to see on the outside of the box facing up. I did do “multi-cut”. Once cut, I folded the box, using a bone folder. I then inked the edges with Close To My Heart White Daisy stamp ink.
I then formed the box and glued the two flaps to secure it.
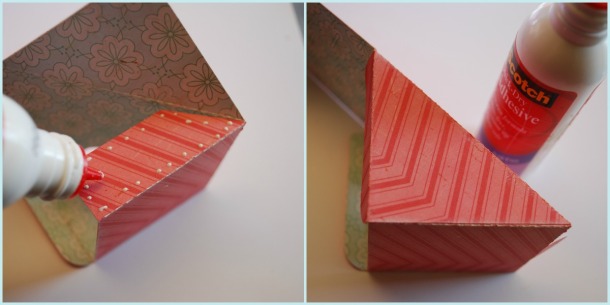
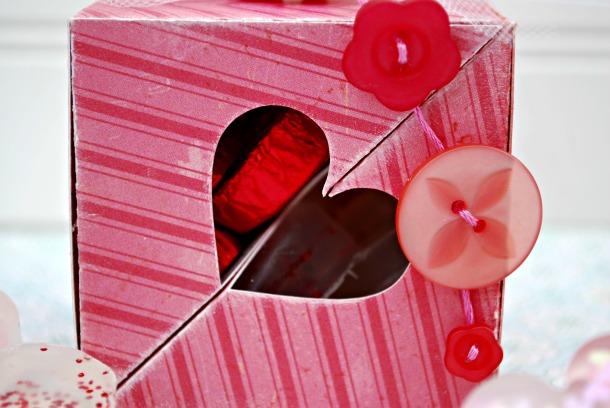
Once glue dried, I filled the boxes and closed them up (one box held 5 pieces of Bliss chocolates and one box held 4 heart soaps.) I then attached the boxes together.
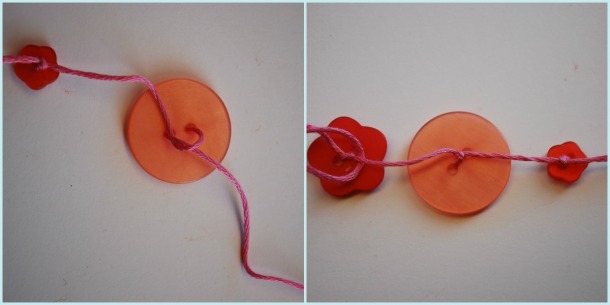
Once boxes were assembled, filled and attached, I cut a piece of white tulle that was about 2.5 inches x 12 inches. I then wrapped that around the box and tied a bow at the top. I then made a button chain using Close to My Heart Red Assortment buttons and Close to My Heart Bubblegum Embroidery Floss using the below technique.
I then tied the button chain to the center of the bow and then wrapped Close To My Heart Cotton Candy Designer Ribbon around the middle of the bow to hide the embroidery floss.
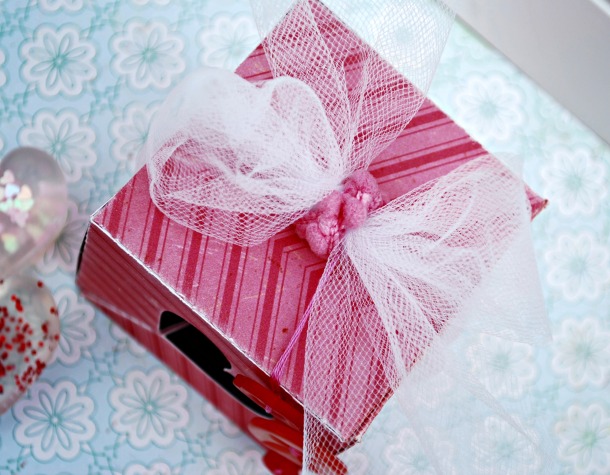
I then attached the button on the button chain to the box for more security with Glue Dot minis.
There you have it! A sweet and chic Valentine treat!
Thanks for sharing a piece of “wishing you a very sweet and squeaky clean Valentine’s Day” pie with me and be sure to head over to see what sweet, and I do honestly do mean sweet (I have had the honor to meet her) Courtney, from Courts Crafts Corner has to share!
If you lost track of the hop, you can refer to the below 🙂
Linking up to:


I love, love the soap, Arin!! So clever and awesome!! And the boxes are fabulous!! The tulle ribbon and button chain are gorgeous!! Great job on both!! So happy to be hopping with you!! Have a wonderful weekend 🙂
Lisa
A Mermaid’s Crafts
Thank you Lisa! I am so honored to be sharing creative space with you twice in one week! Happy Valentine’s Day!
WOW!!! How awesome is this!!! I love the tutorial on the soap…..FAB Valentine’s day project!!
Thanks for sharing and have a GREAT weekend!!!
Thank you Jessica! I thought the soap would be a fun little treat! Have a great Valentine’s Day!
OMG, I love that you added glitter to your soap! I love making soap, but never thought of that! also, thanks for adding the whole line up in case someone got lost! Good work! Thanks so much for being a part of this hop! Smiles, Jill
Jill! Thank you so much for having me be a part of it! I just am so inspired by these ladies! You did a great job organizing the hop! Happy Valentine’s Day!
Okay what fun fun projects, So going to pin and try the soap next year for my daughter. Thanks much for sharing.
Thank you, it was a fun project! Have a great Valentine’s Day!
Your treat and soap box is so cute! I am a subscriber and I love your facebook page! 🙂
Thank you Sarah and I hope you have a great Valentine’s Day!
Oh my gosh! I can’t believe how cute and easy these are! Thank you so much for the tutorial- these are adorable! Totally gonna go make some now! haha!
Hugs!
Heather P
Thanks Heather! They are soo easy! Happy Valentine’s Day!
This was so cute and it appeared to be easy. I will have to try this with my kids. With six kids you can never have too much soap. 🙂
Thank you Margaret! Oh it is soo easy, you would have a blast doing it! Thanks for stopping by!
Arin, what a sweet treat to share!! I’ve often wondered about making little soaps — The-Girl-Child received a kit one year and it was a NIGHTMARE, but you’ve made me want to try it again!! 🙂 TFS…
BIG HUGS,
Amy 🙂 at http://www.lovetocrop.com
PS… I already subscribe and I just became a fan on facebook too!! 🙂 Thanks for the chance to win your fun prize!!
Thanks so much Amy for stopping by! I hope you do try this, it is really fun and low drama crafting! 🙂
Wonderful project. Love the box and the soap is fabulous.
TFS!
Cindy Lou
Thank you Cindy Lou! Happy Valentine’s Day!
Arin, this is just one of the neatest crafts Ive seen! I really want to try it 🙂 I love love love the box and all the fun items you used for the soap!
Great project! Nice to be hopping along with ya 🙂
Shelly
thanks Shelly! I am so glad you have been enjoying the hop! Thanks for stopping by and Happy Valentines Day!
Great idea and supe clean gift project. Thanks for the tutorial. They look so beautiful
This is so sweet. I love it.
DIANA L.
http://dianamlarson.blogspot.com
Eeeeek! Soaps and chocolate…clever girl! Great tutorials too..you outdid yourself. Ok..maybe I’ll try my silhouette again…I’m all in for one page designs that don’t need to be ungroup. Hugs!
thanks girl! Yes a little ambitious…love the one page designs!
Arin – these boxes are gorgeous – what a wonderful gift. The soaps look awesome!! TFS
Aww Karon, hearing that from your, the queen of gorgeous just made my day!
What an amazing hop today! Love that soap. And your box is stunning. Sooo perfect for Valentine’s Day.
Thank you Angi! I am thrilled to hear you had a great time hoping with us today!
Great project! Love those little soaps! Thanks for joining us over at 3 Girl Jam Challenges! DT Member Carri~Abusybee
Thank You for stopping by!
Wow, awesome project! I may have to give this a try:) What a fun gift idea too:) TFS!
Thank you Sherrie! Happy Valentines Day!
This is so cute I just lovethese treat boxes
Thank you for joining us at Little Scrap pieces.
LSP–DT member
DIANA L.
http://dianamlarson.blogspot.com
I have always wanted to try to make soap, how fun! Love the treat boxes too, (more importantly I love what’s inside the boxes…LOVE LOVE Dove Chocolate!!!) Every year I try to think of something fun for my Mother-in-Law for Valentine’s, I might attempt this. TFS!!!
Wow, these little glitter soaps are adorable and that box just tops them off perfectly! Thanks for the tutorial…I actually have a glycerin soap bar that I’ve been wanting to use and this is the project for me! I am a fan on your FB page and I’m subscribed to your blog as well!
Help! I clicked on the Follow button for your blog but I keep getting an error message that says my subscription did not go through because my email address isn’t correct. How do I add my email address to my subscription request? I can’t find an email subscribe link on your blog, just the WordPress follow button up at the top.
These are sooo cute!
What beautiful soap and your pictures were just perfect to show them off! What a darling idea for a gift. It was a pleasure hopping with you and I will be back to check out more!
Happy Crafting,
Kelsie Ann
cutcraftcreate.blogspot.com
This is fabulous! I know what Im diong for Valentines next year, LOL!! The littel box you inserted them in looks great, too, super embellishments. And yes, it did stain the silicon mold. Not to wehre I couldn’t use it for crafty stuff again, but probably not food….I’d have to work really hard to get the wax off. And the glitter, LOL!!!
Thanks for playing our Pink and Red Challenge at 4 Crafty Chicks, great job!
This is absolutely fabulous. I haven’t made soap in such a long time. I love how your box fits together. Thanks for linking up with 3 Girl JAM.
Cheri – 3GJ DT
http://www.djssundries.blogspot.com
super paper wonderul bow amazing tutorial. Thanks so much for joining the lsp challenge this week. Karen
This is perfect.. I just bought a silicone heart mold at the Dollar store that I can use to make this! Thanks for the tutorial.
Fantastic treat boxes! I love the red and pink paper and the way you added those fabulous buttons and bow at the top. Thank you so much for sharing your inspiration with us at 4 Crafty Chicks.
I love that soap! So sparkly. I haven’t ventured into that yet! Thanks for sharing.
Pingback: Happy Valentine’s Day! « A Piece of Life's Pie
This is such a great project! Love those boxes! Thanks for linking up with 3GJ!
Julie
http://3girljam.blogspot.com/
http://3girljamchallenge.blogspot.com/