RSS Feed

Category Archives: Uncategorized

Yum-Yum Time!

DSC_5633

Happy Friday All!  It is Memorial Day Weekend for all of us hard working Americans and this is the time we fire up the grills and dust off the patio furniture to kick off the summer and remember those who paid the ultimate price for the reason we can wave our flags high  from our homes.

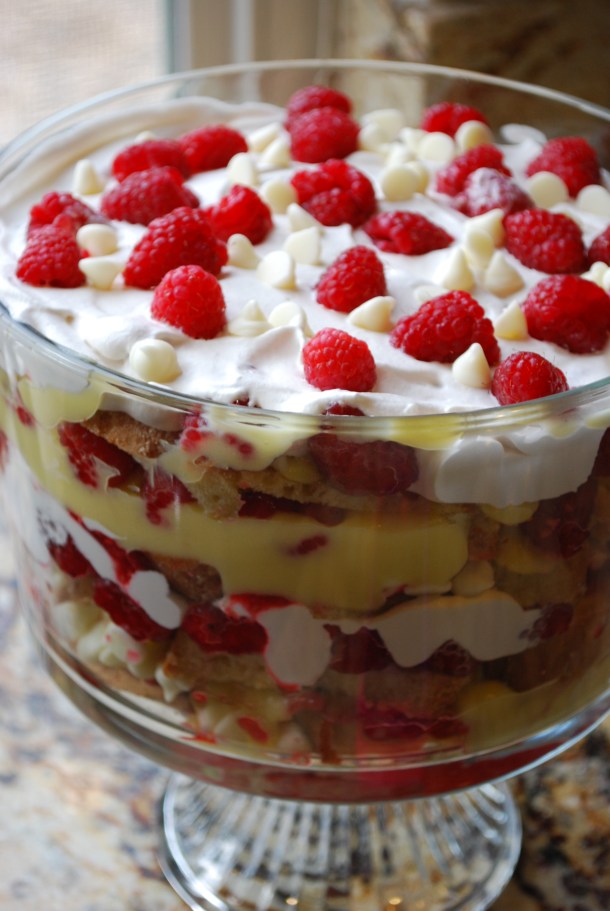
With any holiday in this house, food is just a given.  I love to cook as much as I love to craft and I think I love to eat more than both combined! So I will share one of my new favorite summer desserts . . . Very Berry Trifle  made with Cream Cheese Pound Cake.

  1. I found the pound cake recipe via Pinterst of course! Once baked, I separate in half and freeze one half for another trifle.  I slice the half I am using in about inch slices and set aside.
  2. To make the fruit base I prep and slice full container of  fresh strawberries and toss in a sauce with about 1/4 cup of sugar and a vanilla bean I split open.  I cook on simmer until the berries are mushy and all the sugar is disolved, fish out the vanilla bean and then puree it using a stick blender.  Set aside to cool.  I also slice another full container of strawberries and wash a small container of raspberries and set aside
  3. Using an instant vanilla pudding I make the pudding per instruction and add the guts of a vanilla bean (I think you are getting I love vanilla . . . I feel this takes a big place for flavor of the usual Brandy or Cognac that is called in most traditional trifle recipes).  I set in fridge to set up.
  4. As the puree and pudding are processing, I take a half pint of whipping cream and add 1/4 cup of powder sugar and whip together using my stand mixer (hand mixers would work fine as well) until it has nice semi firm peaks.
  5. Using  a trifle bowl (any bowl would work) I begin the layering of the  fresh berries, pudding, puree, pound cake, puree, whipped cream, berries, and (very light layer) white chocolate chips in that order.   Let sit in the fridge for about 2 hours before serving and you got yourself a fresh and very yummy dessert that will be a showstopper!

DSC_5632

Ingredients:

  • For pound cake see recipe HERE
  • 1 half pint whipping cream
  • 1/4 cup powder sugar
  • 1/4 cup white sugar
  • 1 package of instant pudding (make as directed)
  • 2 Vanilla Beans
  • 2 containers of fresh strawberries
  • 1 container of raspberries
  • 1 cup of white chocolate chips (use a good quality brand for best results)

Thanks for sharing a piece of “yum-yum” pie with me!

Linking up to:

Gotta Create – Wildly Original Linking Party

The Real Thing – Real Family Fun #15

Dreams do Come True!

549034_541247975927154_1604854376_n

Well, do I have some A-M-A-Z-I-N-G news to share.  I have sat on this for a while and I am just bursting with joy to finally get to share this!   I am now one of the  new designer for my favorite crafting celebrity JINGER ADAMS!   Hey, she is the reason I own a Cricut!  She sold the heck out of that little bug to me one night when watching late night TV while I was on bedrest incubating life, and I have followed her ever since!

I had the privileged to meet her this past winter CHA and I was such a goofball with being so star struck!  I could barely talk and had nervous dry mouth, but I was on cloud nine for a month after meeting her (I think there is only one other celebrity that would do that to me and that would be any band member of U2)!  AND now I am on her team!  Dreams do come true!  I still pinch myself to make sure this is really happening! 🙂

Jinger Adams Collection Kits! 

All-Occasion Card Kit

jinger-adams-all-occasion-card-kit-d-20130405110842833~251273

Sweet Tart Scrapbooking Kit

jinger-adams-sweet-tart-scrapbooking-kit-d-20130405110842833~251282

To kick off the announcement of her new product and new team we have planned some amazing giveaways of her Collection Kits! Woot! Woot!  Make sure you follow the new designers blogs and give them a shout out in a comment. There will be a winner announced from each of the blogs!  Also, head over to Jinger’s Facebook page and be sure to LIKE it, you will not want to miss anything that she has cookn’!

Now head over and meet this AMAZINGLY TALENTED group of designers!

Life’s Cowgirl Theme Birthday Party on a Budget!

Today is my two year blog anniversary! I can’t believe how good this blog has been to me. I have met some amazing fellow crafters that I think may be life long friends through this blog and it has given this very social girl that is now home raising two small children an outlet of creativity and social contact with ladies that share my same interests. I have been honored to grow this little ol’ blog of nothing into something that is part of my everyday life that has given back to me already so much. Today I am reposting my very first blog post ever as a crafting blogger, my first ever Cricut Crafted birthday party. Thank you all for sweet encouragement and support I have had over the past two years!

apieceoflifespie's avatarA Piece of Life's Pie

My oldest just turned 3 and she had a fascination with Jessie, from Toy Story, and she requested a Jessie and Bullseye themed party.  I thought, “Not a problem” until I found out that to just limit the party swag to just those two characters was going to be tricky if I was to buy anything commercially and stay on a resonable budget.

I took matters into my own hands and started doing my homework and managed to be able to throw a cute and on budget themed birthday party that looked like a good amount of money was thrown at it.

For invitations, I had a friend that is a graphic artist design me a custom invite that looked like a movie stub that I could sent the file to Costco Photo and have two invitations printed out on a 4×6 photo.  I then found a plain primary colors note card…

View original post 537 more words

Winner, Winner, Chicken Dinner!

Just popping in today to announce the lucky random winner to Monday’s FCCB’s April Fools Day Blog Crawl blog candy of Heidi Swapp Swag!! SBC_hs-00791

Drum roll Please!

Maida @ Loving Scrapper 101

Congratulations!  I will be in touch to get your mailing info! 

For the rest of ya’ll, I bet you have noticed my blog got a bit of a face lift recently!  The ever so talented and lovely Madeline, from TSV Blog Design has been my blog designer and I just love her!  If you are in the market for a bit of “spring bloggy spruce up” then drop her a line!

Thanks for sharing a peice of “even my blog is getting a bit of spring cleaning” pie with me!

Spring Blog Hop! Keepin’ it Fresh, Clean & Simple for Spring!

Spring Blog Hop ButtonHappy First Day of Spring!

Wow!  Throw back the shutters, drag the heavy linens off the bed and put on a pair of shorts!  It is spring!   Welcome to Every Day is an Occasion Spring Blog Hop!  If you came from the most amazingly talented and tough act to follow, Holly from Ribbons and Glue, then you are hangin’ out in the right place.  If you just joined me, you will not want to miss this hop, so head over to our lovely and talented hostess, Jill from Every Day is an Occasion and start there.

DSC_6038

Spring is full of colored pastels, brightly colored eggs, bunnies and peeps, but to me spring means fresh, new, clean and simple.  This is a time where I purge and clean my house from top to bottom and a time my citrus trees are in full bloom and fill my house with sweet fragrance.

Since I am currently in that spring clean mode, I decided to make a wreath the reflects how this time of the year makes me feel.  I know, me and my wreaths, but I collect and make wreaths the way some collect shoes!  I have to have a wreath for every occasion!

This wreath was so easy to make and is made with 100% all natural crafting products!  How fresh is that? I was lucky enough to have Dave from Hemptique pass along some of  their A-M-A-Z-I-N-G product to play and create with.  Among the goodies, I received some Hemp Yarn and Variegated Rainbow Hemp  Spool and just fell in love with the textures and colors!

hemp1

I made the base by wrapping a flat 12 inch wooden ring, that can be found at Michaels or Hobby Lobby, with the Hemp Yarn.  This was easy to do, but a bit time consuming but I did it while watching a movie with the hubs one night.

Then I made these colorful flower blossoms using the Variegated Rainbow Hemp by cutting around 24 inch strands and folding them in half and tie in a bow.  I made three bows fro each flower blossom.  Once all bows were made, I then used a hot glue gun and attached each bow to each other, one on top of another in a way that formed the flower blossoms.  Once the flower blossoms were completed, I trimmed off the excess length and then added a linen button from, Close to My Heart, with hot glue to the center of each blossom.  Once all blossoms were complete, I attached each blossom to the wreath using hot glue.

hemp2

On the top portion of the wreath I cut enough Rainbow Hemp to be able to wrap around the wreath to showcase why it is called Rainbow Hemp.

DSC_6036

To finish the wreath I hand-bound together a nice length of  the Hemp Yarn and looped it around the top of the wreath for hanging and trimmed any excess length.

This wreath is super clean and fresh and because it is made with  the durability of the 100% natural hemp, I have a feeling it will hanging on my front door a lot this year!

Now for the blog candy! 

DSC_6095

Who does not love mini chalkboards on a stick or should I say 8 chalkboards on 8 sticks?  And since I have been gushing about how cool Hemptique product is, I thought I would throw in a ball of the amazing Hemp Yarn! Hey maybe you can make a project combining both these goodies!  All you need to do is :

  • Leave a comment
  • Subscribe to my Blog 
  • Follow me on Facebook! 
  • if you already subscriber and FB follower, leaving a comment will put you in the running as well!

I will be announcing the randomly picked winner on Monday, March 25, 2013! 

Now be sure to head over and check out the sweet and very talented Lisa from A Mermaid’s Crafts to keep hoppin’ along!

Just in case you lost your way . . .

The Blog Hop Line Up!
Jill- Every Day is an Occasion
Holly- Ribbons & Glue
Arin- A Piece of Life’s Pie (You are here)
Lisa- A Mermaid’s Crafts NEXT
Kelsie Ann- Cut Craft Create
Missy- Quick Chick Designs
Court- Court’s Craft Corner
Heather- The Hunny Pot
Shelly- My Paper Love
Jamie- So Much Better With Age
Thanks for sharing a piece of ‘keepin’ it fresh and clean” pie with me!  Be sure to head over to my other creative spring idea I have going on for Decorate to Celebrate!
Linking Up To:
Gotta Create: Wildly Original Linking Party
Navy Wifey Peters Aboard the USS Crafty – Submarine Sundays

It is a Happy Birthday!

Hi everyone!  Today is just going to be a fun day and a more personal post!  My sweet oldest daughter is F-I-V-E years old today!  WOW does time fly! I remember the day we left the hospital, we had 3 days of wonderful nurse assistance thanks to her being a complete breech C-section delivery.  I was freaking out that they were just letting us leave the hospital with this precious baby, no questions asked.  I could barely walk and the hubs looked like a deer in headlights, we were quite the motley crew picture of new parenthood.  I was terrified driving home and walking into the house and wondering what do I do next?  I was a person that could not keep a plant alive so how in the world was I going to care for a baby! That feeling did not last long and I settled into motherhood like it was what I was suppose to do my whole life thanks to a great hubs, some great friends, and a wonderful pediatrician that all passed along  great advise, tools and common sense to the whole baby situation.  And believe it or not, I now can keep plants alive… kids do make you a better person all the way around! PicMonkey Collage

Five years ago today, my little ray of sunshine made us a family and even though she looks just like the hubs, she is 100% my personality.  She even loves to craft and knows what washi tape is!  Love that kid!

hollybday

For her birthday, we took her to Build-A-Bear Workshop along with her gaggle of sweet and very well behaved buddies.  Since they don’t allow cupcakes or cake, I had a friend suggest Teddy Grahams! Brilliant idea.  So I literally threw together these goodie bags using my Cricut Mini Monogram cart, Close To my Heart circle stamp, My Pink Stamper Bitty stamps, American Crafts paper, and washi tape!  EASY PEASY!  picture

Thanks for sharing a piece of “they grow up way too fast” pie with me!

Quick, Cheap, Simple and NO SEW Pennants!

Happy Friday All!

As promised I am sharing the “how-to” on the pennants and stands for a sweet Valentine’s Day decor.  This is something you could knock out in a few hours and that includes the trip get the goods!  This project cost around $10 to make.  A perfect project for this weekend! You could also whip one out for St. Patrick’s Day or even Easter!

tut 3

Step 1: First I found the “stands” at Home Depot.  They are table legs. The do have screws at the bottom, so use a pair of pliers and twist it out (remember righty tighty, lefty loosey 🙂 )  I first applied two coats of Gesso Primer paint (you can use just plain white craft paint instead if you don’t have it on hand)  I then LIGHTLY sanded down the rough and uneven painted areas.  I then started to build my paint layers using pink and red, making sure each color was dry before applying the next (make sure each just apply the colored layers in a random and spotty way, you are going for a rustic feel).  For the top coat of white, I applied two coats to completely cover the table stand.  Once dried, I then hand sanded each table stand to expose the color coats in random rustic pattern.

tut1

Step 2: I had the fabric store cut four different fabric patterns at 1/4 of a yard.  I then ironed each piece of fabric.  Be sure to fold in half with the back exposed and iron flat.  I then cut a 5 inch pennant from Cricut Cartridge Celebrations, using the “foundation pennant” on plain white card stock.  You can just as easily make your own stencil free hand as well.   I then placed the stencil at the top of the fold and traced it using a colored pencil.  Once all four fabric pieces are traced, cut and lay out flat. To fasten the two pieces of the pennant together, you can either use hot glue or heavy duty double sided tape.  I used double sided tape (be sure to really press down the tape before pulling off the top strip).  BE SURE TO LEAVE A LARGE ENOUGH GAP AT THE TOP OF PENNANT SO YOU CAN RUN A PIECE OF YARN THROUGH. Flip top over and adhear to the bottom.  String through and attach to each painted table leg

tut 2

Step 3: In making the hand crochet bows, make a 12 inch chain using three different colors of yarn cut at 24 inches each and tied together at the bottom.  Once chain is made, tie in a bow and attach a Glue Dot to the back of each bow and attach to the table leg (the reason I used a Glue Dot instead of hot glue is that the bows are removable and I can use the table legs for another themed pennant project (birthday party, Easter, etc.).  To see how to make the hand crochet chain, check out the included YouTube video I found!

tut 4

tut 3

Thanks for sharing a piece of “crafting cutness on a dime” pie with me!

Love Simply Made

GnP-Design-Team-Logo-175

Today I am sharing a fun and easy tutorial on how to make a simple yet very sweet Valentine’s Day decor using a Globecraft and Piccolo book board charms and Piccolo Enamel Powder and Piccolo Enamel 3-D Gel!

gppb7

Materials:

Step 1: 

I picked up the decorative table leg at Home Depot and applied two coats of Gesso primer paint with a mini paint roller and set aside to dry.  I dusted it lightly with sand paper to smooth out the Gesso coats.  I then painted two coats each with pink, red and white craft paint allowing for dry time between each coat.  Once final coat of paint was dry, I sanded down to distress allowing the different layers of paint colors to come through.

gcpp1

Step 2:

While waiting for the paint to dry on the wood piece, I applied the Piccolo 3-D Enamel Gel to the book board keys using the the Piccolo Fine Line Applicator Tip for the delicate area.  Set aside to dry.  Once dry repeat on reverse side.

gppb2

Step 3:

While the the 3-D Enamel Gel is drying, apply Piccolo Enamel/Embossing Powder Adhesive to the book board heart.  Dust with Piccolo Poodle Skirt Enamel Powder, shake off excess and set with heat gun. Allow to cool to set.  Repeat this process 2 more times (this will really add color and amazing visual texture). Repeat same steps on reverse side.  Once both sides are complete, apply Glastique Gloss Finishing Glaze and allow to set and dry and then repeat on reverse side.  This protects, seals and adds a very appeasing smooth finish.

gppb3

Step 4:

For bringing this project to a close, I used some small stamps that had a type writer font I found in the bargain bin at Micheal’s and once I inked the stamps, I stamped off some of the ink on a scrap piece of paper to dull down when stamped onto the top of the wood piece. I made sure to stagger the letters in a random pattern to add to a vintage homecrafted  feel.  I then tied the book board keys and heart around the neck of the wood piece, using pink crinkle ribbon.

gppb

Be sure to have the heart charm hang down over the front of the wooden piece. 

gppb8

There it is, a sweet and very simple Valentine Decor that just adds a nice touch to a Valentine’s Day themed tabletop, mantel or center piece.  How could you not fall in love with that gorgeous charm and key set!  All the glimmer, color and depth that heart holds just oozes the feel of romance!

gppb9

gppb7

Be sure to head over to Globecraft and Piccolo’s blog  and check out a coordinating Valentine’s Day project I made using their amazing enamel powders, 3-D enamel gels and book board pieces.  You can also head over to the online store, and indulge yourself on some amazingly rich -to-craft products instead of chocolate this Valentines Day.

DSC_5548

Click picture for details!

Thanks for sharing a piece of  “love is in the air” pie with me!

Linking Up To:

Everyday is an Occasion – Sunday Funday

Gotta Create – Wildly Original Link Party

Sarah Hamer Designs – Link Up Party

Sassy Little Lady – Show and Tell Saturday #2

Angels Homestead – Saturday Spotlight #2

Tatertots and Jello – Weekend Wrap Up

MIA NO LONGER!

Well if you noticed I have been MIA, THANK YOU!  I have missed you all too! I may have not been bloggin’ but I have been up to my knickers in craftin’ these past couple weeks… Here is a sneak peek of some fun things to come this week and beyond!

Monday is Fantabulous Cricut Challenge Blog telling time in a royal way!

Thursday you can find me here and over at Globecraft & Piccolo having a blast with their products!

Friday you will find me back over here with a tutorial on some of these fun projects!

AND you may see me hanging out over at Samantha Walker’s Facebook page at some point this week having fun with some of her new Silhouette images!

Next Wednesday you will get to see something sweetly inspiring  over at Decorate to Celebrate!

peak3

PicMonkey Collage 1

peak 4

Thanks for sharing a piece of “back in the saddle again” pie with me!

First New Year’s Resolution DONE!

So I have a confession to make…  my craft room has been a disaster that was masked by quasi organization ever since we took ownership of this house.   When we first moved, our house was pretty much ripped apart down to its studs and we physically remodeled this house top to bottom with a 12 week old baby and a 20 month old.   Yes, we are a bit insane.    I will have to say the hubs and I never bickered or let some of the endless challenges of having our “Money Pit” experience ever get the best of us.  When we dated and were first married we did a lot of extreme outdoor adventure (climbing MT. Whitney, Half Dome, 56 mile backpacking trips, 120 mile mountain bike trips in Canyon Lands, Utah), so I think that was God setting us up for how to deal with challenges and relying on each other in  extreme settings.  A full remodel with a baby and a toddler would equate for an extreme sport in my book. We had only 1/2 of a bath, NO kitchen, no flooring, and lived in drywall dust for about 8 weeks.

I totally digressed… the once office/craft room (now only craft room with a desk and file cabinet) was the catch-all room during most of the remodel and when I started to transform the catch-all to a craft room, I did a lot of shoving into the closet and half reorganizing so I could just set up the room and craft.

Well that finally caught up with me over this holiday season while doing all my projects, I was finally forced to face the music of my avoidance of the situation.  So last weekend I rolled up my sleeves and spent TWO whole days doing what I should have done 2 years ago.  Sadly, when reorganizing and purging it gets worse before it gets better.  I wanted to throw up my hands and yell UNCLE at one point. Even the hubs came in at one point and nearly had a heart attack on how similar my room looked to an episode of Hoarders, Buried Alive he had once seen.   However, I powered through and now have the craft room and storage for my mini Michaels store I have been needing and wanting!

Before- in the throws of reorg insanity:

IMG_0192[1]

After:  YAY!

IMG_0195[1]

IMG_0194[1]

This closet was the biggest victory.  On the side you don’t see holds my main printer, camera gear, office supplies and a few totes.  On the side you do see holds most of my everyday embellishments,  paint, specialty ribbon and twine, my design team products, extra supplies, makers, pens, a couple totes that host a quit I am working on and gift bags, etc…

craftroom

The shelving unit hosts scrapbooks, my Cuttlebug and Cinch It, all my paper stackers and my 8.5×11 solid stock paper. Next is my sewing station that the hubs built for me and it serves as a ribbon holder as well.  I have a big tool cabinet above this station that I inherited from the hubs and that is hosts all my stamp ink, more embellishments, supplies, Stickles, etc…   The red tool box hosts all my sewing tools.

craft room 2

I decided to organize my loose paper in 13×13 plastic storage bins and store those under my main work space.  The top drawer holds all my scrap paper and then I organized the rest of the drawers by pattern, solid, Christmas, Halloween, novelty/designer paper and small stacks. This should help keep me more on track on what I have and what I need.  The hub built the main craft table, the peg board, and the table that holds my Cricut, Silhouette and color printer.  In the wood drawers under my craft table hosts my heat gun, stamps, stickers, and punches.

So there you have it.  I have managed to successfully knock out one of my New Year’s Resolutions before the end of January!  I have to say I have already done some projects and it is WONDERFUL to be working in a truly organized room!

Thanks for sharing a piece of ” happiness is being organized” pie with me.